
How to Configure In-App Notifications for User Profile Updates Using Communications
In this tutorial, we demonstrate how to configure in-app notifications for user profile updates using the Communications service in the ComUnity Developer Toolkit. This ensures that users receive a personal notification within the application whenever their own profile is updated—either by themselves or by another user, such as an administrator.
To enable this functionality, it is mandatory to include the Notifications template in your project, if it is not already integrated by default. The Notifications templates provides the required structure to support in-app notifications. If it is not included, you will need to build a custom implementation to facilitate notification delivery within your application.
What You’ll Learn
In this tutorial, you will:
Set up a project using predefined templates to enable communications and notifications.
Create a communication event triggered when a user profile is updated.
Configure an in-app notification template to target the affected user.
Add code to the generated OnChange interceptor to trigger the communication event.
Enable communication channels to support in-app delivery.
Test and verify that the notification appears in the user’s application.
By the end of this tutorial, you’ll have a working setup that delivers personalised in-app notifications to individual users whenever their profile is updated.
Prerequisites
Access Requirements
A ComUnity user account with permissions to create and configure projects in the Toolkit.
Technical Knowledge
Familiarity with the Toolkit’s Data and Communication modules.
Knowledge of change interceptors in the .NET ecosystem: Change interceptors are a concept from WCF Data Services and Entity Framework in the .NET ecosystem, specifically C#. In the context of the ComUnity Developer Toolkit, they’re surfaced as part of the auto-generated custom code, which builds on ASP.NET Web API and OData principles.
Project Setup
Before proceeding with the API integration, ensure that you have:
Created a project using the Vacancies and the Notifications templates or similar. The only requirement is that your project has a Notifications templates included.
Successfully build and launch the project—this step is essential, as it generates the Custom Code for entities defined in your Data model. The Custom Code is accessible via the Properties Editor under each entity’s settings and is where change interceptors can be defined or modified.
Registered a user account and signed in to the web app.
Create and Configure the Communication Event
To trigger an in-app notification when a user’s profile is updated, you must create a communication event for the UserProfile entity using Communications.
Follow the steps below to configure this:
With your project open in the Toolkit, navigate to the Communications section using the sidebar.
Click the + Add an event button.
In the Add Event modal, complete the fields as follows:
Entity: UserProfile
Event: OnChange
Name: leave the default value (Default)
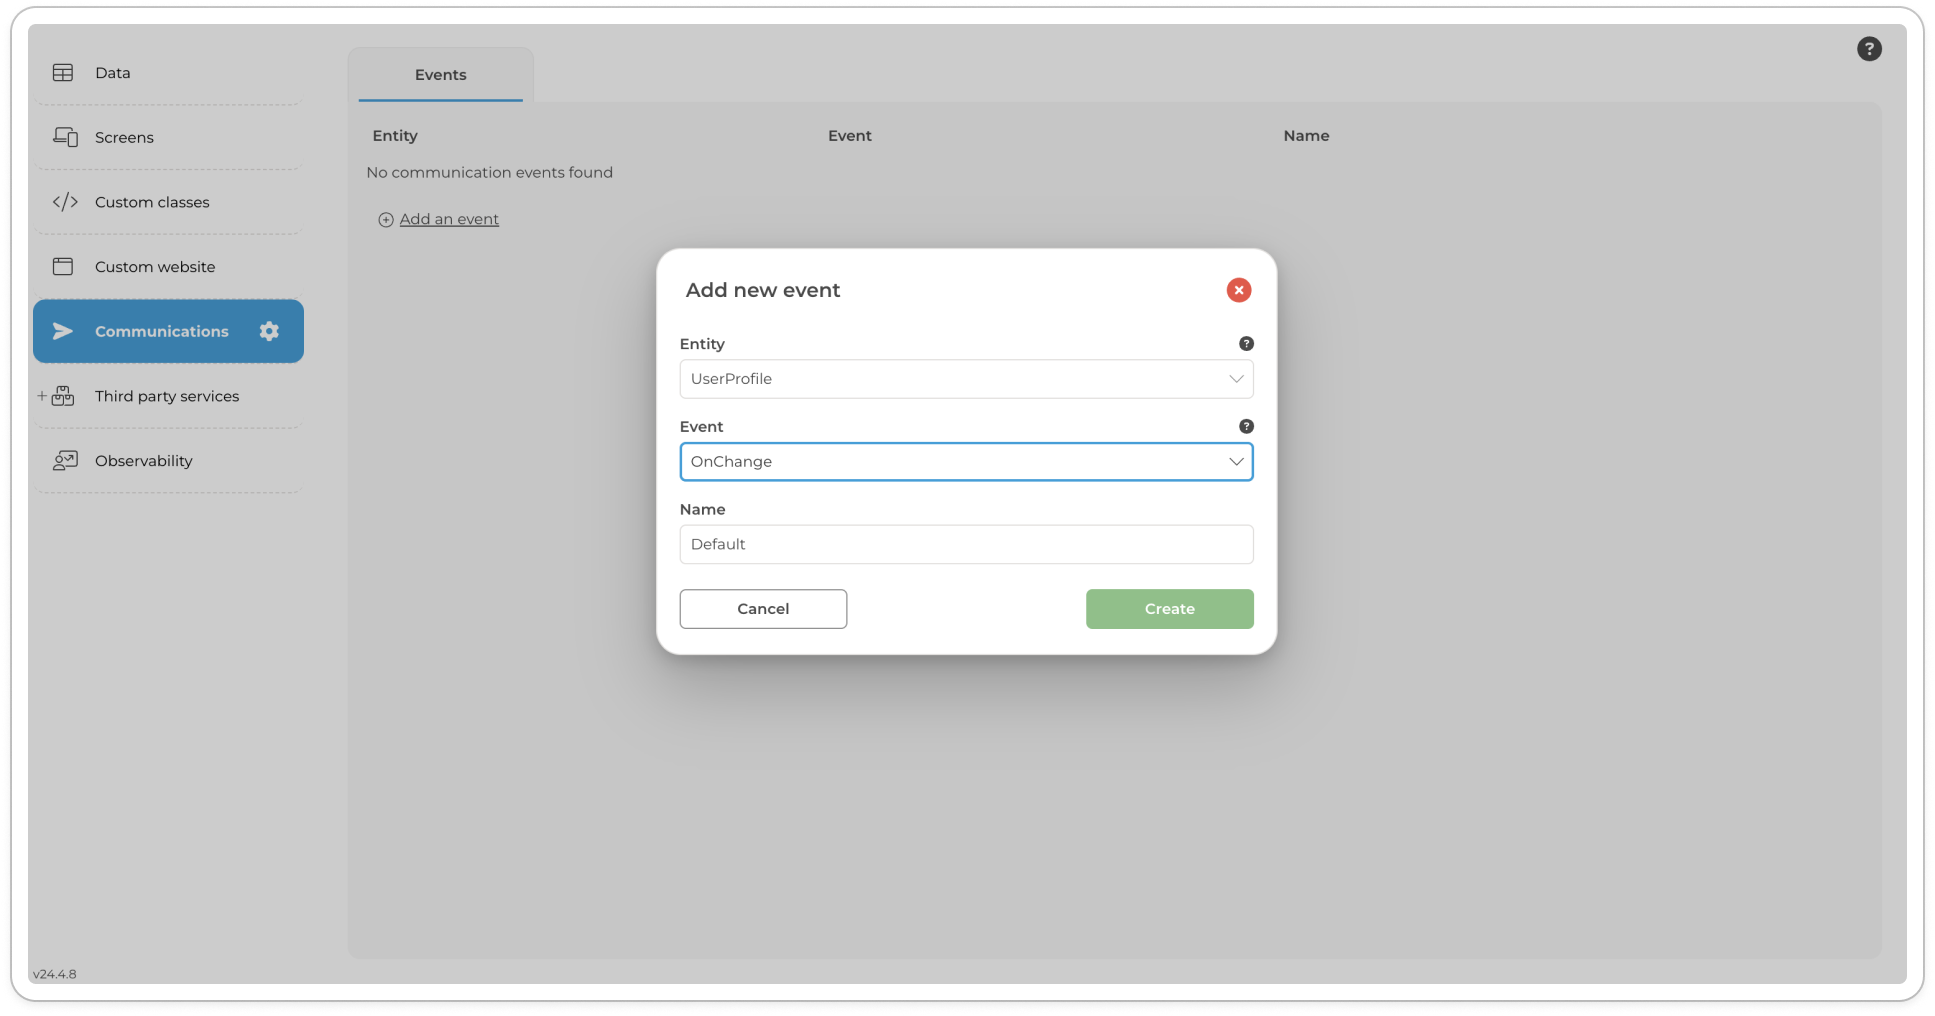
Click Create.
This step registers a communication event that will be triggered whenever changes are detected in the UserProfile entity.
Define the In-App Notification Template
Once the event is created, configure the in-app message that will be sent to the user:
Locate the event you just created in the list.
Click the pen icon to open the Action Templates modal.
Select the In App tab.
Fill in the fields using the following values:
FieldValueDescriptionUser ID
Defines the dynamic value of the recipient’s user id for the in-app notification. This value is passed to the Communications service as part of the payload when the service is invoked in the OnChange interceptor of the UserProfile entity.
Title
The in-app's notification title
Message
The in-app's notification body
Click Save to finalise the in-app notification template.
At this point, the event and notification template are configured, but the event still needs to be triggered from the OnChange interceptor in the generated custom code for the UserProfile entity.
Integrate the Event in Custom Code
To trigger the in-app notification when a user profile is updated, you must call the communication event from the OnChange interceptor in the UserProfile entity’s custom code. This interceptor is generated when the project is built and allows you to insert custom logic during entity lifecycle events.
Follow the steps below to integrate the event:
In the Toolkit, go to Data > List.
Select the UserProfile entity.
Click More Settings > Custom Code.
A code editor will open displaying the generated custom class for UserProfile.
Locate the OnChange method in the file.
Below the comment that marks where custom logic can be added, insert the following line:
Close the editor and click Save to apply your changes.
Build your project to generate the latest code and publish to IIS.
This call instructs the Toolkit’s Communications service to trigger the event you configured earlier, using the current user’s ID as the target recipient.
Configure Channel Priorities
To ensure in-app notifications are delivered, you must enable the INAPP communication channel in your project. This tells the Communications service to use in-app delivery for the notification event.
Follow the steps below:
With the Toolkit open, navigate to the top left of the header bar and click the cog icon next to your project name to open Project Settings. Click the cog icon to open the Project Settings modal.
In the Project Settings modal, open the Communications tab.
Click + Add a channel priority.
In the modal that appears:
Select INAPP.
Click Add to confirm.
Close the modal.
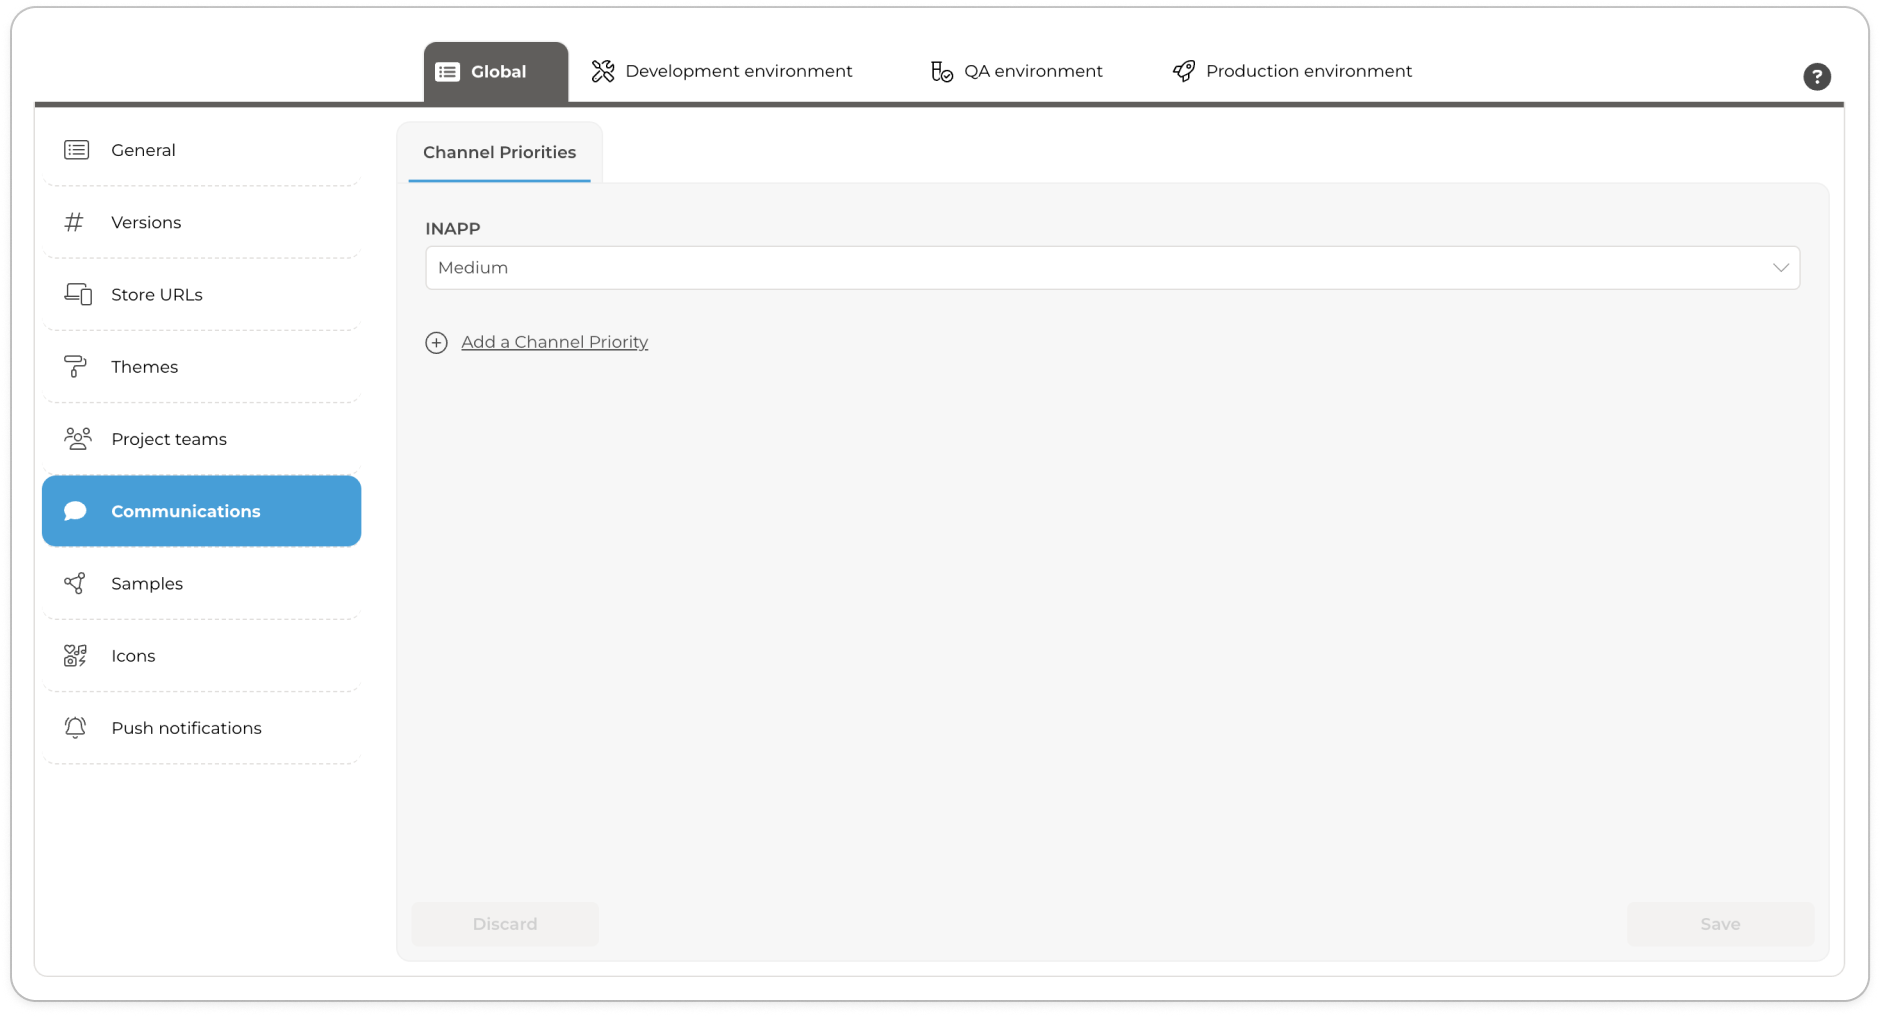
With the INAPP channel enabled, the system is now configured to deliver notifications directly within the app interface when the event is triggered.
At this point, you must contact ComUnity Support to manually restart the Communications service for your project. There is ongoing work to automate this process, but currently, this step is required to activate communication features in a newly configured project.
Test the In-App Notification
Once your configuration is complete, you can test the notification flow directly in your running project.
Follow the steps below:
Launch your project - this step updates the project metadata and reflects your latest configuration changes and also opens your application in a browser tab.
While signed in, navigate to your My Profile page.
Make a visible change to your profile—for example, update your name or contact information.
Save the changes.
Navigate to the Notifications tab in the web app.
You should see a new notification with the title:
“User Profile is updated”
This confirms that the in-app notification has been triggered and successfully delivered to the signed-in user.
If no notification appears, ensure the INAPP channel is enabled and the Communications service has been restarted. Contact ComUnity Support to manually restart the service. This step is currently required but will be automated in a future release.
Conclusion
In this tutorial, we configured in-app notifications for user profile updates using the Communications service in the ComUnity Developer Toolkit. By defining a communication event, customising the notification template, updating the OnChange interceptor, and enabling the INAPP channel, we created a personalised feedback mechanism that alerts users when their profile has been updated.
This approach provides a reliable, event-driven way to keep users informed of changes relevant to them and can be extended to support other communication scenarios within your application.
To explore further:
Configure broadcast in-app notifications for events that affect multiple users (e.g. new announcements or published content).
Add fallback channels such as email to ensure important messages reach users even when they’re not signed in.
By leveraging the Communications service and built-in tooling, you can create responsive, user-focused communication flows with minimal overhead.
📚 Further Reading
Communications overview – Learn more about how communication events and channels work within the ComUnity Developer Toolkit.
INAPP communication channel - Learn more about fields used to configure in-app notifications.