 icon, this icon allows you to add a new Table Link.
3. Click  icon, and an **Add a new table link** modal window will appear on your screen.
4. In the **From Entity** box, select the entity from which you want to start the link. In the **To Entity** box, select the entity to which you want to link. The order of selection does not matter, as table links have no direction.
5. Finally, click on the **Add table link** button to create your table link.
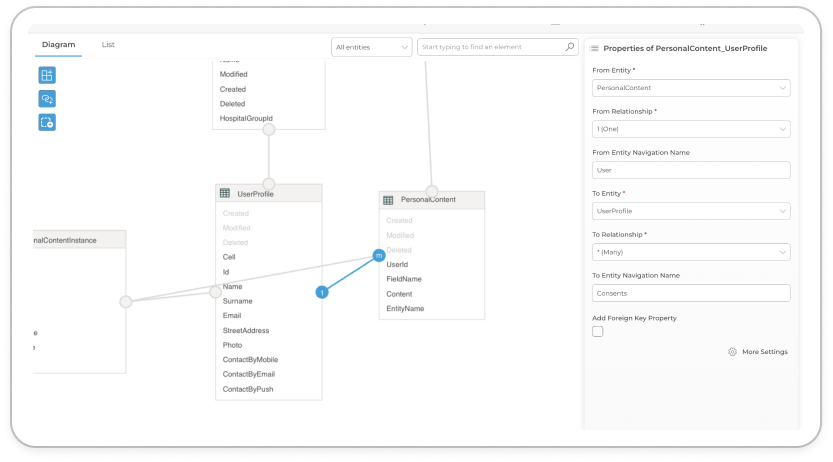
Once you have created your table link, it will appear as a line connecting the entities in a Diagram view. In the expanded view of an entity, the table link will be displayed as a field with a  icon. When you click on a table link, it will be selected and indicated by turning blue in the Diagram view or having a blue background in the List view, as shown in the images below. This visual indication helps you identify and interact with the table link easily.
Upon selecting a table link, a properties dialog will appear, providing you with a comprehensive set of options and settings to configure the behaviour and characteristics of the association. You can customise the table link properties according to your specific requirements.
For a detailed description and explanation of each table link property, please refer to the [table](#table-link-properties) below.
icon, this icon allows you to add a new Table Link.
3. Click  icon, and an **Add a new table link** modal window will appear on your screen.
4. In the **From Entity** box, select the entity from which you want to start the link. In the **To Entity** box, select the entity to which you want to link. The order of selection does not matter, as table links have no direction.
5. Finally, click on the **Add table link** button to create your table link.
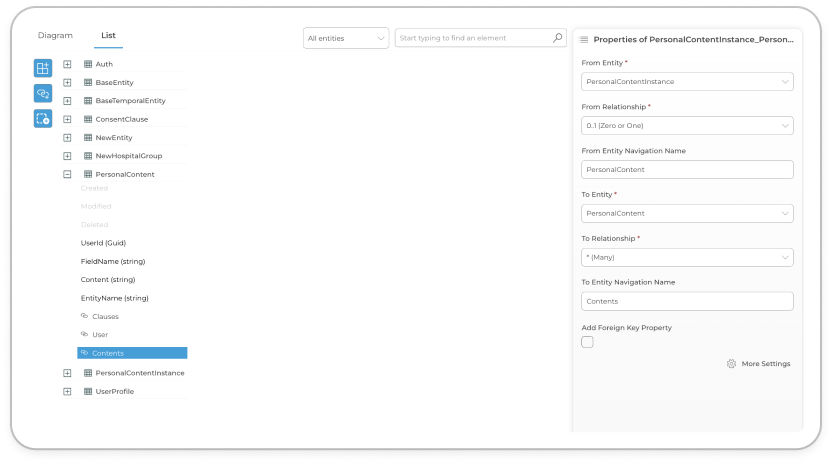
Once you have created your table link, it will appear as a line connecting the entities in a Diagram view. In the expanded view of an entity, the table link will be displayed as a field with a  icon. When you click on a table link, it will be selected and indicated by turning blue in the Diagram view or having a blue background in the List view, as shown in the images below. This visual indication helps you identify and interact with the table link easily.
Upon selecting a table link, a properties dialog will appear, providing you with a comprehensive set of options and settings to configure the behaviour and characteristics of the association. You can customise the table link properties according to your specific requirements.
For a detailed description and explanation of each table link property, please refer to the [table](#table-link-properties) below.
| Association name | Function | Value selection |
|---|---|---|
| From Entity | Identifies the source entity | Select an Entity from the list of Tables in the dropdown. |
| From Relationship | Identifies the type of relationship | Select one of: Many | 0..1 (Zero or One) | 1 (On |
| From Entity Navigation Name | Each originating Table Link must be identified with a name. For more information: Go to | Label the Table Link |
| To Entity | Identifies the target entity | Select an Entity from the list of Tables in the dropdown. |
| To Relationship | Identifies the type of relationship | Select one of: Many | 0..1 (Zero or One) | 1 (One) |
| To Entity Navigation Name | Each target Table Link must be identified with a name. For more information: Go to | Label the Table Link |
| Add Foreign Key Property | It is recommended that you include properties in the model that map to foreign keys in the database. With foreign key properties included, you can create or change a relationship by modifying the foreign key value on a dependent object. Using foreign keys is even more essential when working with disconnected entities. Note: that when working with 1-to-1 or 1-to-0..1 relationships, there is no separate foreign key column, the primary key property acts as the foreign key and is always included in the model. https://docs.microsoft.com/en-us/ef/ef6/fundamentals/relationships | Select the checkbox to set a foreign key |