
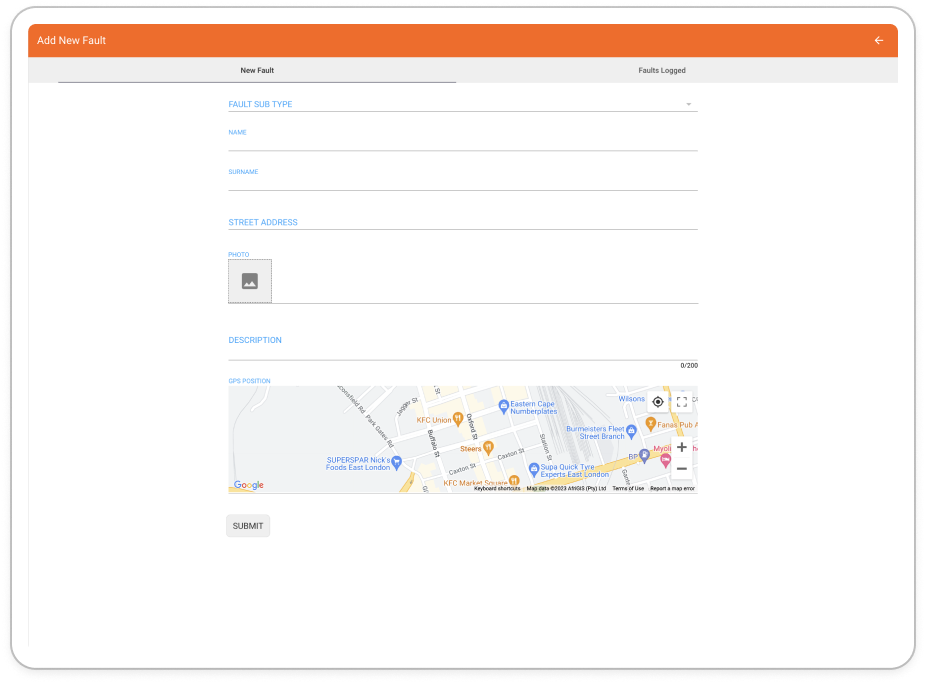
Form
A Form page is primarily used to embed forms, but it can also display static screen components (such as images, text content, static lists) and dynamic lists. In some configuration settings, a form page may simply be referred to as a "Page". The forms embedded within form pages are essential for implementing Create, Read, Update, and Delete (CRUD) operations.
Here are two methods for integrating form pages into your project:
1. Incorporating Forms as Top-level screens: One method involves placing a Form page directly within your project's navigation hierarchy. During screen configuration, you can achieve this by specifying the page type as Form. Additionally, you can make use of the Copy Form functionality. This approach provides swift access to a form page tailored to your needs.
2. Adding Forms as Sub-Screens: Alternatively, as you set up Page Links, Data Entry Screens and Additional Screens, the system takes the initiative to generate the required form page. This automated process ensures the creation of a corresponding blank Form page. Furthermore, you can generate new Form page by embedding Form Item within Lists in your Navigation pages, refer to Adding Sub-Screens to Navigation pages Using List Navigation to explore this method.
Both approaches offer you versatility and simplicity in integrating form pages into your project. When you create a Form page its relevant Screen Controls and Screen Properties are shown in the Screen Controls and Properties panels within the Screen View, respectively:

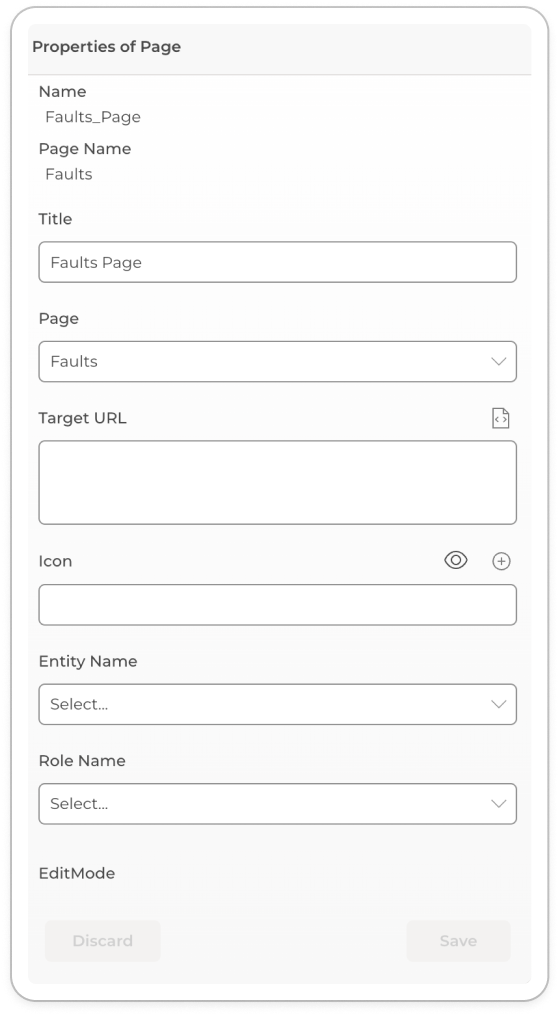
Properties of a Form page
Title
This property allows you to specify the title of your navigation page.
If the title is not set, the system by default uses the name of your link as a title.
Role Name
This property allows you to specify the user role that has access to the navigation page.
If a Role Name is not specified a navigational component is visible to all authenticated users conversely when a Role Name is specified for a navigational component, that component is then conditionally displayed in the client. Authenticated users on the applications will see only the component which they have permission rights for, otherwise if they do not have the correct access rights the navigational elements will be hidden from their view. To learn more about how to configure user roles and permissions view Authorisation.
Icon
This property allows you to select an icon which is used to prefix the Title.
For menu item links the Icon field is required otherwise broken icon images will be rendered before your menu items.
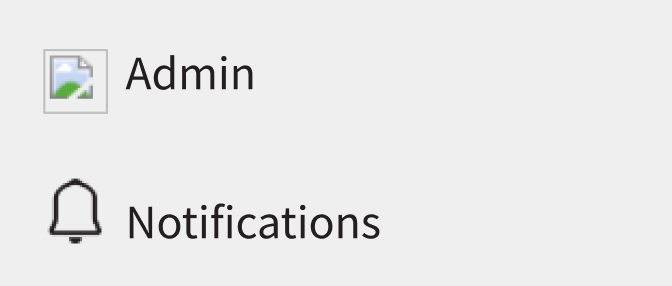
The screenshot below shows two menu items displayed as part of the Main Menu on a web application built using the ComUnity Development Toolkit. During navigation configuration the Icon for the Admin link was not selected during development, so it is displayed as a broken image before the link name, whereas for the Notifications menu item, a bell icon was selected.
Selected Icon
This property allows you to specify a selected icon for your IOS applications.
Page
By default a form page is empty on creation, the Page property allows you to select and copy the content and functionality of an existing form page from a list of all form the pages which exist in your application.
Entity name
This property allows you to select an entity by name from a list of entities which exist in the Data Model. This value can usually be determined by the system from the Target URL, however when the Target URL is not set then this value may be required in order to set the correct data entity that must be used for the form.
The Entity name and the Target URL serve the same purpose, to avoid redundancy you define one or the other but not both in the same configuration.
Target URL
The Target URL allows you to specify the OData resource path for the form and must be a collection for an insert and a single record for an update or delete operation.
Edit Mode
A Form page will open in “edit” mode for a new record and “read” mode for and existing record. The Edit Mode will open existing records in “edit” mode when this value is selected.
What comes next?
Once you have set the properties of your Form Page, you can start building your page content using screen controls. You can find a comprehensive guide on how to do this in the Screen Controls section. In the next section, we will discuss how to implement features specific to the Form Page, which can all be done using screen controls strategically.
Supported components: