ComUnity Platform
25.x
25.x
  • ComUnity Technical Overview
  • Getting Started
    • ComUnity Developer Toolkit
      • Login
      • Manage your account: Profile, Settings, and Actions
    • Manage your project
      • Create a project
      • Project Settings
      • General
      • Build and launch your project
      • Templates
      • App Users & Roles
      • Themes
      • Versions
      • Icon Management
      • Store URLs
      • Deploy
        • Environments
        • Manual Project Deployment Across Environments
        • Configuration
    • Organisations
      • Roles and Permissions
      • Organisational Management
      • Teams
  • Toolkit Guides
    • Data
      • Customising the Data Model
      • Manage Entities in the Data Model: Step-by-Step Guide
      • Setting Up Role-Based Permissions for Entities: Access Control Configuration
      • Creating Entity Associations: Configuring Table Links
      • Manage Inheritance in the Data Model: Configuring Entity Hierarchy and Inheritance
    • Screens
      • Integrated Navigation and UI Builder for Screens in the ComUnity Developer Toolkit
      • Building Screens
        • Screen Controls
        • Navigation
          • Lists in Navigation pages
            • Dynamic List Rendering in Navigation pages
            • Adding Sub-Screens to Navigation pages Using List Navigation
          • Page Link
        • Form
          • Screen Controls
          • Lists in Form pages
            • Static Item - List Item
            • Single Item - List Item
            • Entity Items - List Item
    • Custom Classes
    • Custom Website
      • Bindings
      • Pages
        • Page Development
        • Page Elements
        • Templates
        • Resources
    • Communications
      • Configuring Dynamic Action Templates for Event-Driven Communication Channels
        • Event Details: Understanding Data Sources for Dynamic Template Building
        • Email
        • SMS & WhatsApp
        • INAPP
        • Push Notifications
        • HTTP
      • Triggering the Communication Service
      • Communication Settings
    • Events and Notifications Management
    • Observability
      • Client Analytics
      • Metrics
      • Traces
    • Third Party Services
      • Azure Function Apps
      • Azure Logic Apps
      • Integrations
      • Microsoft Fabric
      • APIs
    • Services
      • Media Server
  • General Information
    • Debugging and editing your application code
  • Toolkit Tutorials
    • Build a Simple Blog App: The Beginner's Guide to ComUnity Development
    • Building a Comprehensive News App: Integrating In-App Messaging, Push Notifications, SMS, and Email
    • APIs
      • JSON Placeholder Todos API Integration in a Simple Blog App
      • Countries GraphQL API Integration Using the APIs feature in the Toolkit
      • Integrating the JSONPlaceholder Posts API Using the Toolkit’s OpenAPI Feature
      • OData Integration with the Bookings API Using the APIs feature
    • How to Configure In-App Notifications for User Profile Updates Using Communications
  • Enhancing Cases App: Real-time Comment Notifications
  • Reference articles
    • Glossary
    • Privacy by Design
    • OData
    • Razor
    • CRUD Functions
    • Mustache Templating
    • Temporal Tables
    • Integrating WhatsApp Business with the ComUnity Platform
    • Data Types
    • Field Types
    • Table Links
    • Release Notes
    • Keyboard Shortcuts
Powered by GitBook
On this page
  • Before You Begin
  • What You’ll Learn
  • Prerequisites
  • Resources
  • Step-by-Step Tutorial: Integrating an API Using an OpenAPI Specification
Export as PDF
  1. Toolkit Tutorials
  2. APIs

Integrating the JSONPlaceholder Posts API Using the Toolkit’s OpenAPI Feature

This tutorial demonstrates how to integrate an external HTTP-based REST API using the OpenAPI integration support in the ComUnity Developer Toolkit. While the target API—JSONPlaceholder—is a public test API that does not natively provide an OpenAPI definition, we’ve prepared a compliant OpenAPI 3.1 specification to enable its integration into the Toolkit.

The ComUnity Developer Toolkit supports OpenAPI-based integrations via Azure API Management (APIM). When registering an API, the Toolkit expects a specification document that adheres to Azure’s OpenAPI requirements. Once registered, this allows developers to expose endpoints, define Virtual Entities, and render structured data inside the application using the Toolkit’s OData-compatible pipeline.

Before You Begin

If you’re new to the APIs feature in the ComUnity Developer Toolkit, we recommend first reviewing the JSONPlaceholder Todos API tutorial, which introduces key concepts for integrating external APIs using the Toolkit. This tutorial builds upon the same foundational workflow but focuses specifically on integrating APIs using an OpenAPI specification, including steps to register, validate, and expose an API via Azure API Management (APIM).

What You’ll Learn

By the end of this tutorial, you’ll be able to:

  • Register a public REST API using an OpenAPI 3.1 specification

  • Configure and validate the API in Azure API Management (APIM) via the ComUnity Developer Toolkit.

  • Define a Virtual Entity to model post data from the JSONPlaceholder API.

  • Use Custom Classes and Controllers to:

    • Fetch all posts

    • Retrieve a specific post by ID

    • Create a new post using a POST request

  • Build custom UI to:

    • Display a dynamic list of all posts

    • Enable click-to-navigate functionality, allowing users to tap on a post and view its details on a dedicated screen.

    • Add a basic input form allowing users to submit new posts from within the app

Prerequisites

  1. Access Requirements

    • A ComUnity user account with the necessary permissions (contact ComUnity Support if required).

    • A single-tenant environment is required for API integration (organisations must host their own instance of the Toolkit in Azure).

    • If a single-tenant instance is unavailable, users can request access to the shared ComUnity Platform environment (API management is not supported in this environment).

  2. Technical Knowledge

    • C# programming skills

    • Familiarity with WCF Data Services, Entity Framework, and OData

  3. Development Tools

    • Visual Studio 2022 (Community, Professional, or Enterprise)

  4. Project Setup Before proceeding with the GraphQL API integration, ensure that you have:

    1. Created a project from a sample – Follow the Create a Project section to set up a new project using a sample of your choice.

    2. Built and launched the project successfully.

    3. Registered a user account in your app – Sign up and log in within your app

Once your project is ready, you can proceed with configuring the OpenAPI integration.

Resources

  1. OpenAPI specification file for JSON placeholder Posts

Step-by-Step Tutorial: Integrating an API Using an OpenAPI Specification

To configure the OpenAPI API in the ComUnity Developer Toolkit, follow these steps:

  1. Register the OpenAPI API in the Toolkit:

    1. In the ComUnity Developer Toolkit, navigate to Third Party Services > APIs.

    2. Provide a name and an optional description for your API.

    3. In the Provide Service URL field, enter:

      https://jsonplaceholder.typicode.com

    4. Click the Select file button and upload the OpenAPI specification file for JSONPlaceholder Posts, which is provided in the Resources section.

    5. Click the Add Azure API to your project button to register and configure the API in Azure API Management (APIM).

    This process ensures the API is properly registered and available for further integration within the Toolkit.

  2. Verify the API Registration in Azure:

    1. After the API is registered, click the ellipsis (⋮) button next to the API in the Toolkit and select View in Azure Portal.

    2. You will be redirected to Azure API Management (APIM).

    3. Locate your newly created API under APIs (use the search function if needed).

    4. Open the Settings tab and check for any schema validation errors to confirm the API was successfully registered.

  3. Test the JSONPlaceholder API in Azure:

    1. In Azure API Management (APIM ) under APIs, navigate to the Test tab.

    2. Select one of the available operations listed under the API, such as GET /posts, GET /posts/{id}, or POST /posts.

    3. Enter appropriate test data if required (e.g., provide a valid post ID or request body).

    4. Click Send to execute the request and verify that a successful response is returned from the backend service.

  4. Configure Properties and Security of the Post Virtual Entity in the Data Model: Go back to the ComUnity Developer Toolkit under Data. Create a Virtual Entity named Post. For detailed instructions on creating Virtual Entities in the Toolkit, refer to the Virtual Entities section.

    Take note to include the following properties for the entity:

    Although the properties in the OpenAPI specification are defined using lowercase names, the Toolkit automatically capitalises all entity property names to align with C# conventions. According to Microsoft’s .NET naming guidelines, public members such as properties should use Pascal casing, where each word begins with an uppercase letter. As a result, all properties in the data model have been capitalised to ensure compatibility with C# standards and to avoid conflicts or unexpected behaviour at runtime.

    For more details, see Microsoft’s .NET Naming Guidelines.

    1. UserId → int

    2. Id → string

    3. Title → string

    4. Body → string

    For guidance on configuring table security and surfacing entity data to user roles, refer to:

    • JSON Placeholder Todos API Integration in a Simple Blog App

    • Setting Up Role-Based Permissions for Entities: Access Control Configuration

    Ensure that the Insert and View permissions are granted to your User role.

  5. Expose the Posts API via Virtual Entities and Custom Classes:

    1. Go to Custom Classes in the Toolkit. Select the WebApiConfig class and register your Post Virtual Entity as shown below (line 23):

      WebApiConfig
      using System;
      using System.Web.Http;
      using System.Web.Http.OData.Extensions;
      using openapitutorial.Custom;
      
      namespace openapitutorial
      {
          /*
          For additional details on using OData in ASP.NET Web API, visit the following link.
          https://docs.microsoft.com/en-za/aspnet/web-api/overview/odata-support-in-aspnet-web-api/
          */
          public static partial class WebApiConfig
          {
              static partial void CustomRegister(System.Web.Http.HttpConfiguration config)
              {
                  // Web API configuration and services
      
                  // Web API routes
                  config.MapHttpAttributeRoutes();
      
                  System.Web.Http.OData.Builder.ODataConventionModelBuilder builder = new System.Web.Http.OData.Builder.ODataConventionModelBuilder();
                  //builder.EntitySet<ClassName>("ClassName");
                  builder.EntitySet<Custom.Post>("Post");
      
                  config.Routes.MapODataServiceRoute("odata", "odata", builder.GetEdmModel());
              }
          }
      }
      

    2. Update the Post entity class as shown below:

      Post
      using System;
      using System.Collections.Generic;
      using System.Linq;
      using System.Web;
      using System.ComponentModel.DataAnnotations;
      using System.ComponentModel.DataAnnotations.Schema;
      
      namespace openapitutorial.Custom
      {
          /*
          The following code should be added to the WebApiConfig class to add this class to the Service Root
          builder.EntitySet<Custom.Post>("Post");
          */
          public class Post
          {
              public int UserId { get; set; }
              public string Id { get; set; }
              public string Title { get; set; }
              public string Body { get; set; }
          }
      }
      

    3. Create a new class named PostsAPI, where you will define the logic for communicating with the API via Azure API Management, as shown below ensure that you also update your packages as shown:

      PostsAPI
      using System;
      using System.Collections.Generic;
      using System.Linq;
      using System.Web;
      using System.Net.Http;
      using System.Net.Http.Headers;
      using Newtonsoft.Json;
              
      namespace openapitutorial.Custom
      {
          public class PostsAPI
          {
          
             /**To replace the API’s URL comment below, navigate to Third Party Services > APIs in the Toolkit, locate your API, and copy its URL.**/
             private static readonly string _baseUrl = //***"API_URL"***//;
          
              public static List<Post> Posts()
              {
                var httpClient = new ComUnity.DataServices.ServiceUtility.ComUnityHttpClient(//***"Application Name"***//, //***"Azure API name"***//);
                  
                  var res = httpClient.GetAsync($"{_baseUrl}/posts").Result;
                  res.EnsureSuccessStatusCode();
                  var content = res.Content.ReadAsStringAsync().Result;
                  var posts = Newtonsoft.Json.JsonConvert.DeserializeObject<List<Post>>(content);
                  return posts.ToList();
                  
              }
      
               public static Post GetPost(string id) 
              { 
                  var httpClient = new ComUnity.DataServices.ServiceUtility.ComUnityHttpClient (//***"Application Name"***//, //***"Azure API name"***//);
      
                  var response = httpClient.GetAsync($"{_baseUrl}/posts/{id}").Result;
                  response.EnsureSuccessStatusCode();
                  var content = response.Content.ReadAsStringAsync().Result;
                  return  Newtonsoft.Json.JsonConvert.DeserializeObject<Post>(content);
              }
      
              public static Post AddPost(string body)
              {
                  var httpClient = new ComUnity.DataServices.ServiceUtility.ComUnityHttpClient (//***"Application Name"***//, //***"Azure API name"***//);
      
                  HttpRequestMessage mess = new HttpRequestMessage(HttpMethod.Post, $"{_baseUrl}/posts");
                  mess.Content = new StringContent(body);
                  mess.Content.Headers.ContentType = new MediaTypeHeaderValue("application/json");
      
                  var response = httpClient.SendAsync(mess).Result;
                  if (response.IsSuccessStatusCode) {
                      var content = response.Content.ReadAsStringAsync().Result;
                      return Newtonsoft.Json.JsonConvert.DeserializeObject<Post>(content);
                  }
                  return null;
              }
          
          }
      }
      

    4. Update your controller class as shown below, ensure that you also update all your packages on your file:

      Post Controller
      using System.Linq;
      using System.Web.Http.OData;
      using System.Web.Http.OData.Query;
      using System.Web.Http.OData.Routing;
            
      namespace openapitutorial.Custom
      {
          public class PostController : System.Web.Http.OData.ODataController
          {
               // GET: odata/Posts
              [EnableQuery]
              public IQueryable<Post> GetPost()
              {
                  return PostsAPI.Posts().AsQueryable();
              }
      
              [EnableQuery]
              public Post GetPost([System.Web.Http.OData.FromODataUri] string key)
              {
                  return PostsAPI.GetPost(key);
              }
      
             
              //POST: odata/Posts
              public System.Web.Http.IHttpActionResult Post()
              {
                  var bb = Request.Content.ReadAsStreamAsync().Result;
                  bb.Position = 0;
                  var byteArray = new byte[bb.Length];
                  bb.Read(byteArray, 0, (int)bb.Length);
                  var body = System.Text.Encoding.Default.GetString(byteArray);
                  var post = PostsAPI.AddPost(body);
                  if (post == null) return BadRequest("Failed to add a post.");
                  return Created(post);
              }
          }
      }
      

    5. Build your project after updating your Data model and Custom Classes so as to publish your changes and as well as to confirm that there are no errors in your build, if any exist debug and resolve them before proceeding to the next step.

  6. Build the UI: In this step we will outline how to build the Posts screen that shows all posts as a list and supports the ability to click to navigate to the Post by ID screen, which shows dynamic details of the selected list item, and finally the Add a Post screen, which shows a simple form to create a post.

    1. Navigate to Screens in the Toolkit and create a Posts navigation page.

      1. Set an icon of your choice.

      2. Add a List control to your screen.

      3. Click the List item to activate it.

      4. In the Properties Editor, set the following fields:

        • Data Path:

          /Post
        • Item Title:

          {{= Title}}
      5. Click the Save button to persist your changes.

      6. Launch your project to see your list of the titles of posts fetched from the JsonPlaceholder API server in the Posts page.

    2. To enable click-to-navigate functionality to a Post by ID screen:

      1. Click to select the List in the Posts screen configured in step 6.a.

      2. Supported screen controls will appear under List Navigation under the Screen Structure tab.

      3. Drag and drop a Form screen control into the List.

      4. A subpage of Form type will be inserted under the Posts page in the navigation hierarchy under Screen View.

      5. Navigate to the subpage and update its title to Post by ID:

        Post by ID
      6. Set its Target URL to:

        /Post('{{= postId}}')
      7. Click Save.

      8. Insert an Auto Input screen control into the Post by ID page.

      9. Copy the Name value of the Post by ID from the Properties Editor.

      10. Go back to the Posts page screen configured in step 6a, select the List we configured in step 6.a.iii, and set its Target URL to:

        LINK:<<Sytem Default Name of the Post by ID screen>>?postId={{= Id }}

      These actions enable click-to-navigate functionality from List items to the Post by ID screen.

      For more information, see the section Dynamic List Rendering in Navigation pages.

    3. To creat a Add a Post screen:

      The JSONPlaceholder API simulates a successful record creation (201 Created) for POST requests, but no actual data is stored. The API response is mocked and does not persist changes.

      1. Select the Posts screen we made in step 6.a in the navigation hierarchy under Screen View.

      2. This action will display supported screen controls under the Screen Structure tab.

      3. Add a Page Link control onto it just above the List we configured in step 6a. A subpage will be created in the hierarchy.

      4. Select the subpage and configure the following values:

        • Title:

          Add Post

        • Icon:

          svg/sdk/plus-circle/Bootstrap/regular

        • Target URL:

          /Post

      5. Click Save.

      6. Drag and drop Auto Input screen controls into the screen structure of Add Post page.

      7. Add a Button control and configure the following settings:

        • Navigate URL:

          ..
      8. Click to select each Auto Input and set its Exclude field to:

        UserId, Id

      9. Click Save.

    These actions complete the UI by enabling users to view a list of posts, navigate to a screen displaying the details of a selected post, and submit new posts using a form.

  7. Build and launch your project to view your posts in the application. Click Add Post to navigate to the Add Post screen, where you can fill out a form to create a new post. Click on any post in the list to be redirected to the Post by ID page, where you can view the post’s details.

2KB
jsonplaceholder_openapi_azure.yaml
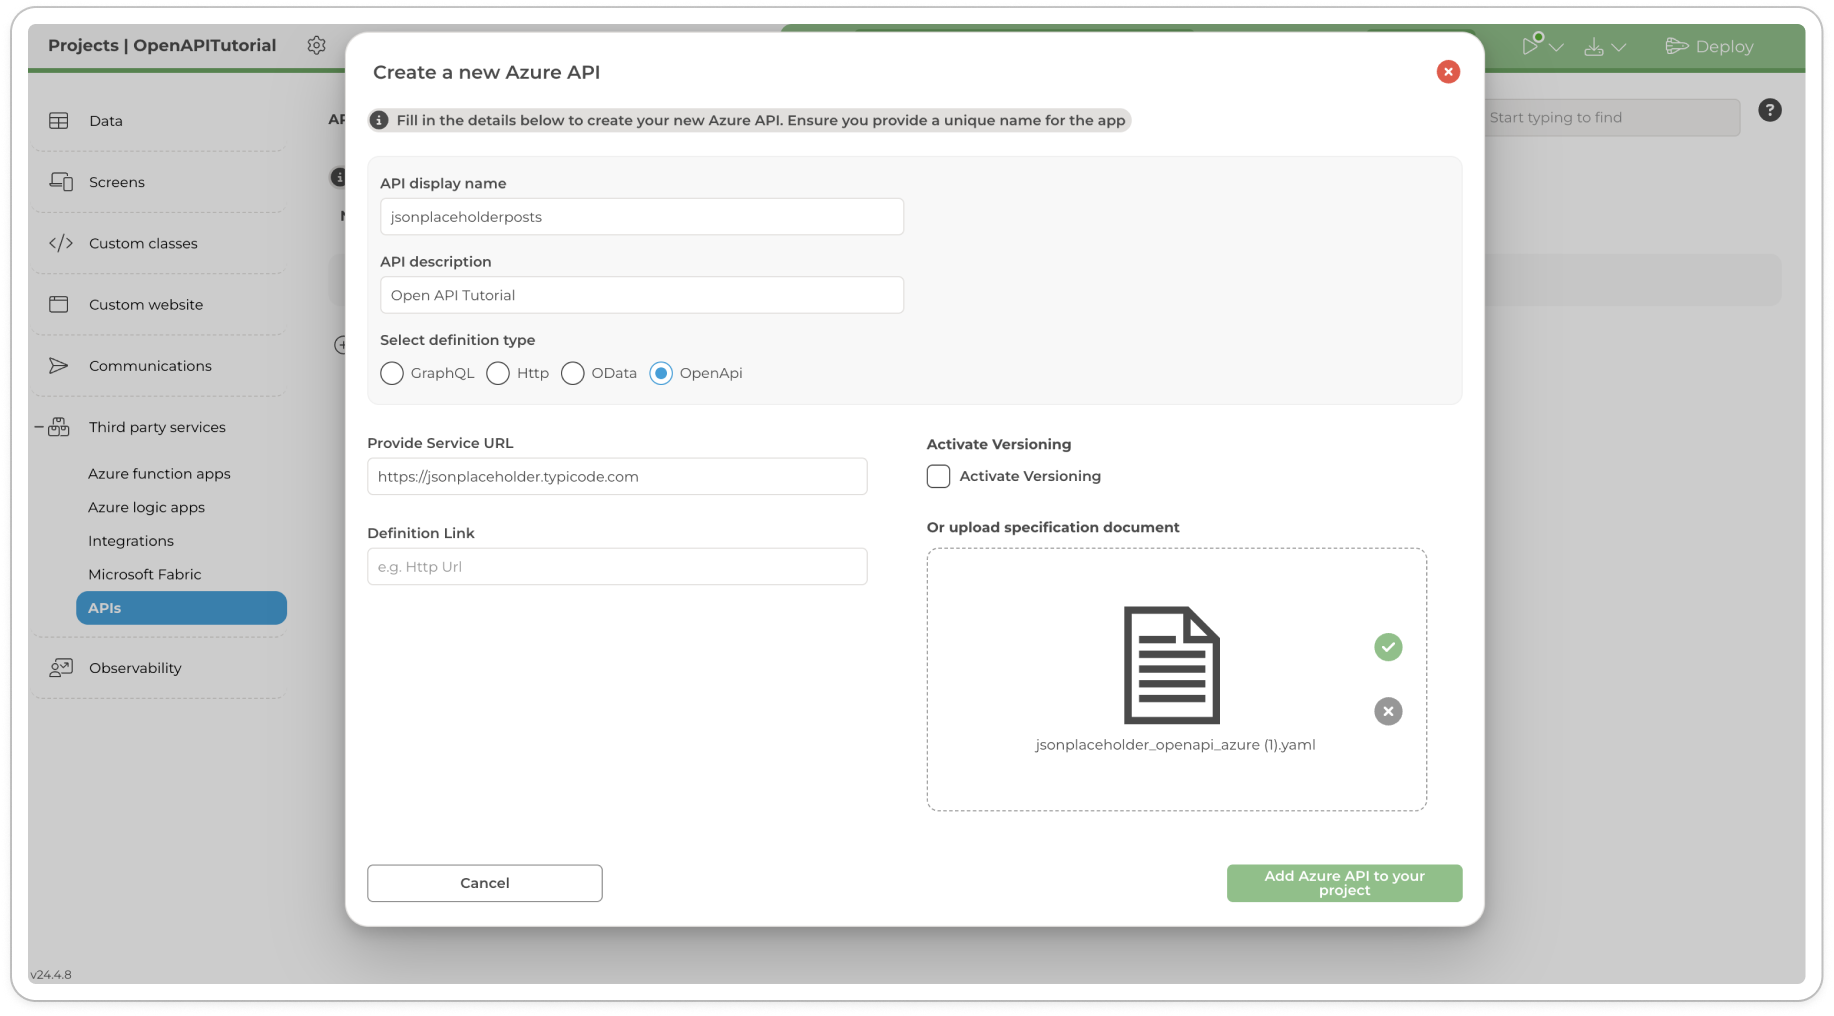
Registering the OpenAPI API in the Toolkit
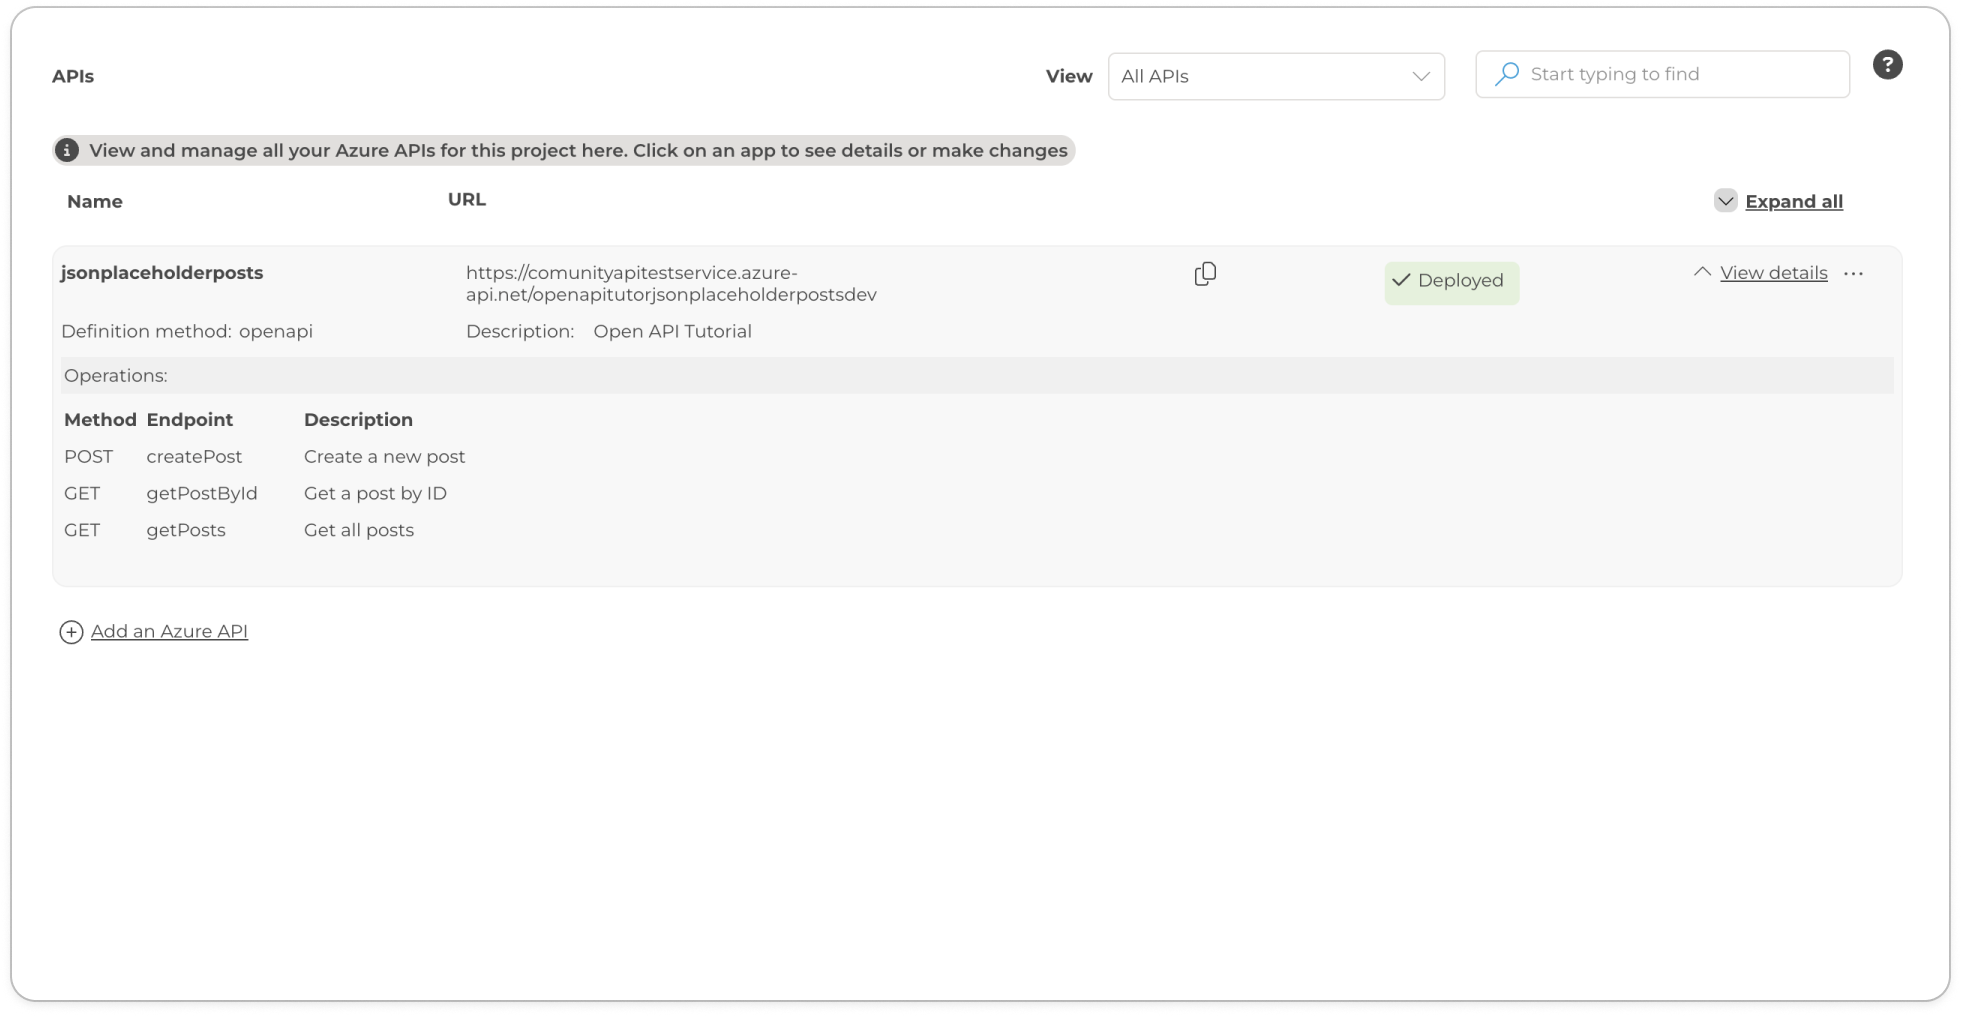
An OpenAPI API that has been registered in Azure API Management (APIM) and had its operations manually retrieved into the Toolkit by selecting “Fetch operations from Azure” from the API options ellipsis (⋮) menu.
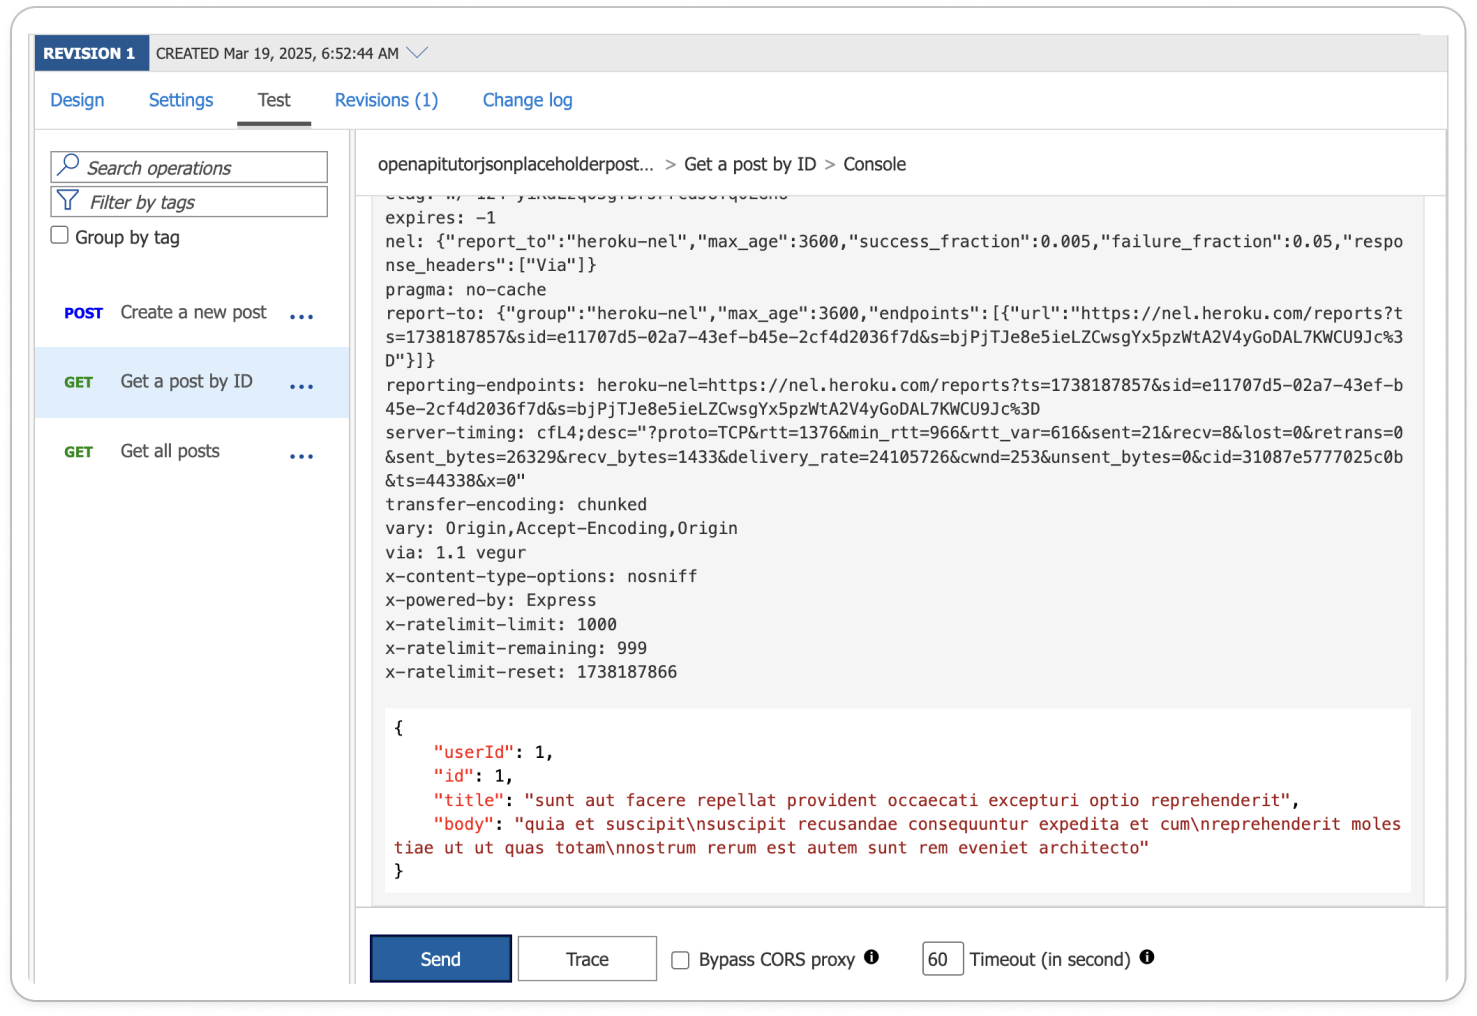
Testing fetch post by id
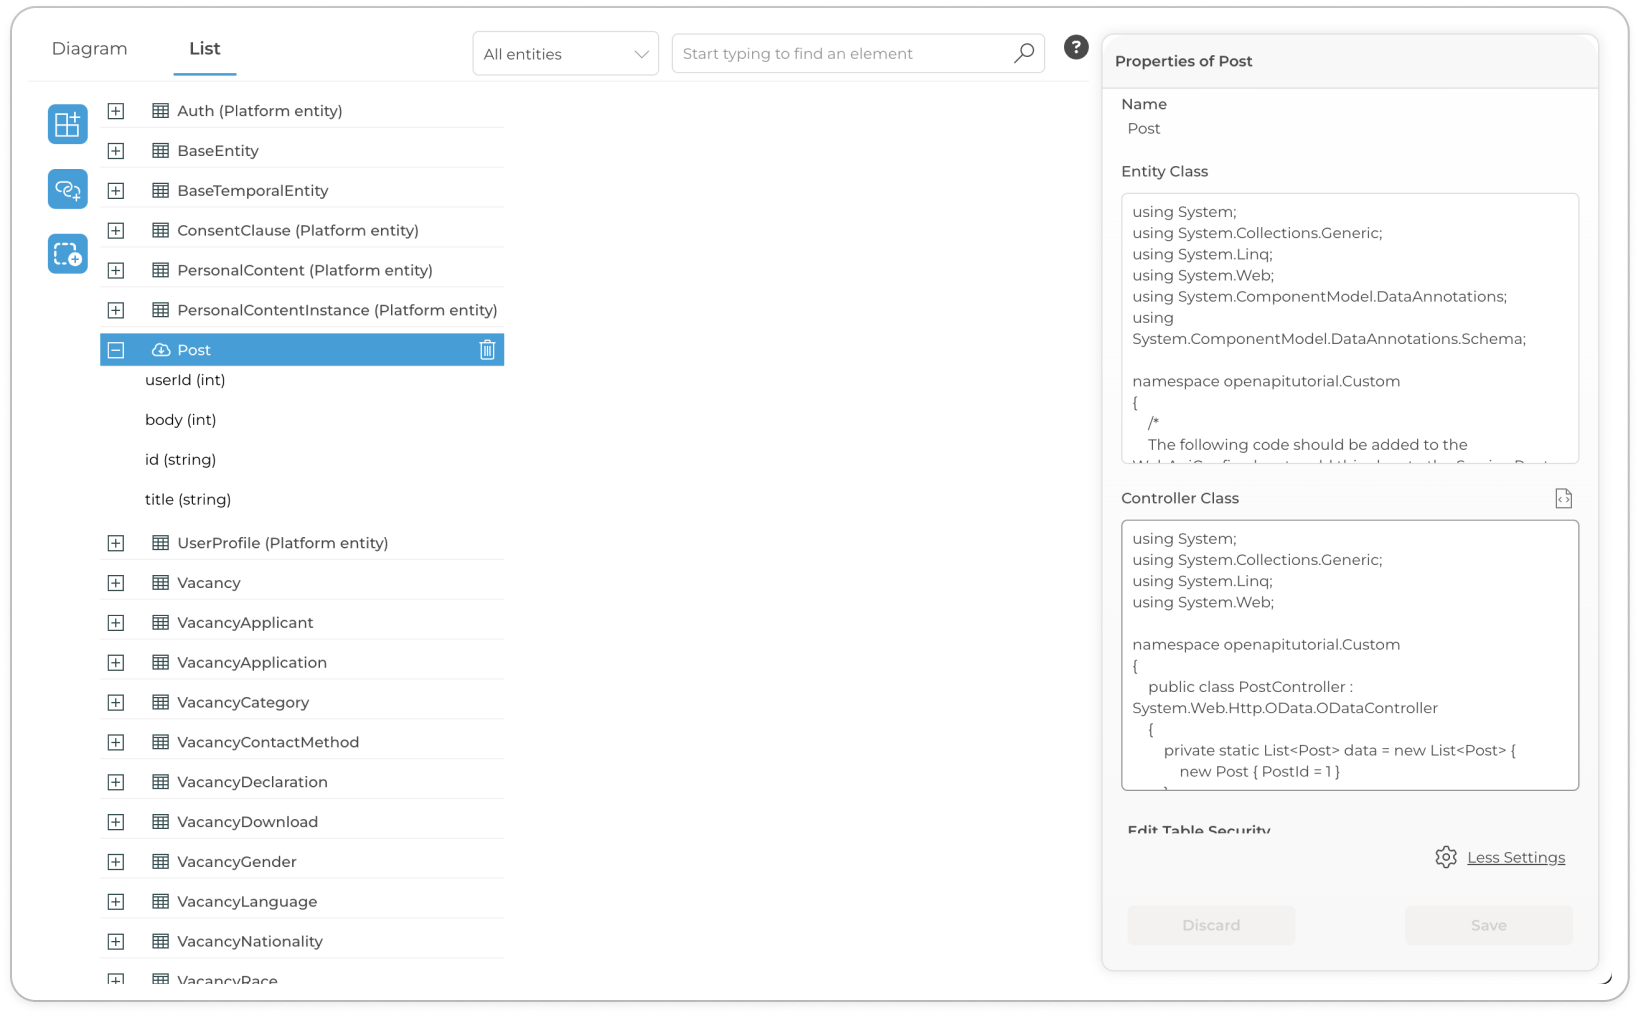
Post Virtual Entity schema definition
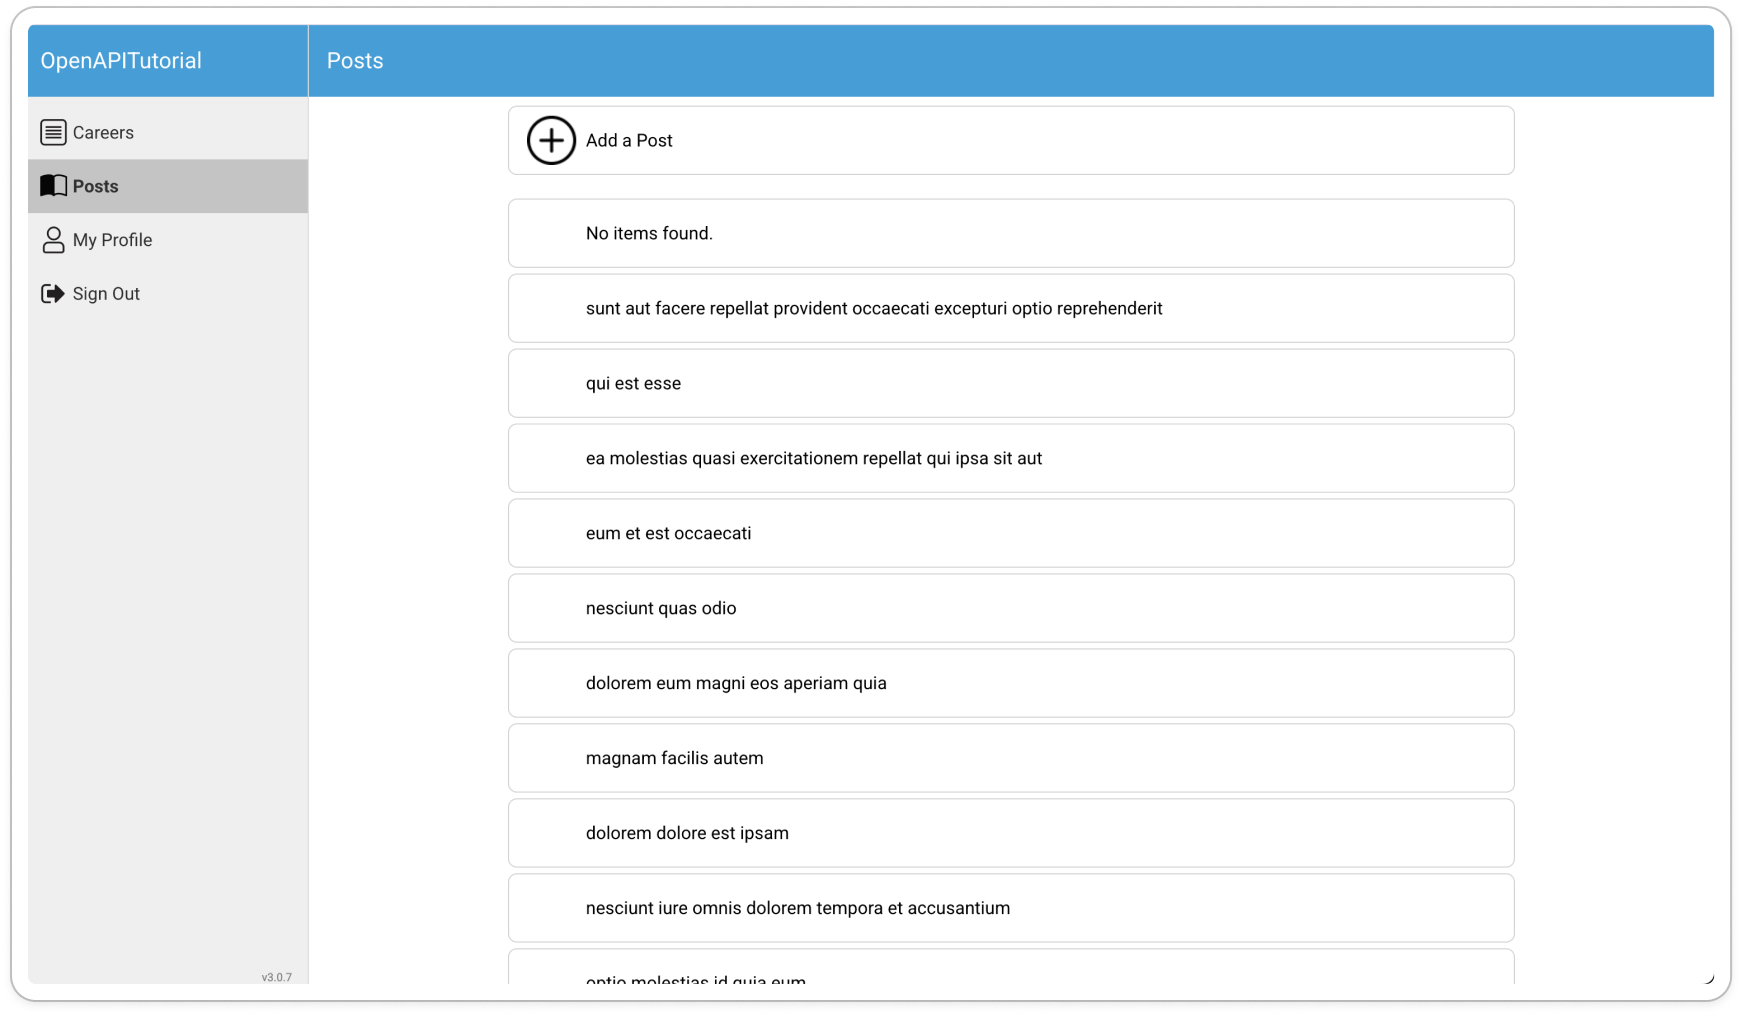
Posts screen in the application