
App Users & Roles
A robust user role and permission management system, empowering administrators to control user access and capabilities.
This section details managing user access, roles, and authentication credential settings via the App Users & Roles panel in Project Settings. Learn the practical steps for configuring these options directly in the Toolkit, keeping in mind that settings are applied per-environment (accessed under the Development, QA, or Production tabs).
When working with roles in the Toolkit, it’s important to note that there are two categories:
Platform Authorization Roles – system-defined roles (e.g., Administrator, Staff, User) that enforce security and access at the platform level.
Application Roles (via the UserRoles template)– project-specific roles that live in your app’s data model and are used for grouping, segmentation, and business logic.
Within this section, you will learn how to use the App Users & Roles panel to:
Manage User Accounts: View registered users, assign or remove roles from specific users, and manage user account status (e.g., deletion, password resets [if applicable here]).
Define and Manage Platfrom Authorization Roles: Understand the default roles (Administrator, Staff, User), create and delete custom roles tailored to your project's needs.
Understand User Group Categories: Learn about the Registered Users and Anonymous Users groups (introduced in v25.1) and how they function alongside roles in the permission model.
View Role Permissions: Use the Role-Centric view to see which data entities a specific role currently has access to.
Configure Authentication Credentials: Customise the validation rules enforced for user logins and password requirements (e.g., length, complexity, lifetime).
Prerequisite Knowledge
This section assumes a basic understanding of core ComUnity Toolkit concepts. For in-depth information on the underlying principles, please refer to:
Permission Concepts & Table Security
The App Users & Roles panel is organised into three main tabs, each dedicated to specific management tasks:
Users Tab: Focuses on individual user account management and role assignments.
Roles Tab: Deals with defining roles and viewing their assigned permissions.
Credentials Tab: Allows configuration of authentication validation rules.
Subsequent sections will detail the procedures for each tab. To access this panel, please follow the instructions in the "Accessing the App Users & Roles Panel" section below.
Accessing the App Users & Roles
To manage users, roles, and credentials, you first need to navigate to the App Users & Roles panel within your project settings. Follow these steps:

Log in to the ComUnity Developer Toolkit.
Select Your Project: From the main dashboard, choose the project you wish to manage.
Open Project Settings: Once your project is open in the Toolkit, locate and click the cog icon (typically displayed with a tooltip reading “Project settings”).
(Optional: For additional details on accessing Project Settings, refer to the main Project Settings section.)
Select the Environment: Within the Project Settings panel, you will see tabs representing your different environments (e.g.Development environment, QA environment, Production environment) at the top. Click on the specific environment tab for which you want to manage app users and roles. Configuration is environment-specific.
Navigate to App Users & Roles: In the left-hand sidebar menu within the selected environment's settings, click on App Users & Roles.
You are now in the App Users & Roles panel, where you can access the Users, Roles, and Credentials tabs described in the following sections.
Understanding Roles and User Groups
Before managing specific permissions and users, it's important to understand the different types of Roles and User Groups available in the ComUnity Toolkit, as these form the basis for controlling access.
User Roles
User Roles are assigned to individual authenticated users to define their capabilities within the application. The Toolkit includes:
Default Roles:
Administrator: Typically has full access and control over project settings and user management.
Staff: Often used for internal users who manage content or perform operational tasks.
User: The standard default role assigned upon registration, usually with general access and limited permissions.
Custom Roles: You can define your own roles to meet specific project requirements, allowing for granular control over permissions (e.g., "Auditor," "Content Editor").
(For a deeper dive into Role-Based Access Control concepts, see the Table Security).
User Group Categories (Introduced in v25.1):
Version 25.1 introduced two special group categories that simplify applying permissions to broad sets of users:
Registered Users:
Definition: This is a dynamic group that automatically includes all authenticated users, regardless of their specific assigned role (Administrator, Staff, User, or any Custom Role).
Purpose: Use this as a shortcut in Table Security to apply baseline permissions (e.g., read access to a shared resource) uniformly across all logged-in users without needing to assign the permission to each role individually.
Caution: Avoid using this group if access needs to be restricted only to specific roles; assign permissions explicitly to those roles instead.
Anonymous Users:
Definition: This group represents users who access parts of your application without logging in (i.e., unauthenticated visitors).
Purpose: Primarily used for public-facing elements, such as websites or widgets that display data from your ComUnity project (e.g., public event listings).
Best Practice: By default, grant only read-only access to Anonymous Users. Granting write permissions should be done cautiously and only where explicitly necessary for specific public interactions.
Permissions Context:
Both individual User Roles (Default and Custom) and the User Group Categories (Registered Users, Anonymous Users) serve as targets when you define access permissions for specific data entities using Table Security.
(Refer to the Setting up Role-Based Permissions for Entities: Access Control Configuration documentation for detailed instructions on configuring Table Security rules.)
Platform Roles vs Application Roles
It's important to distinguish between two kinds of roles in the ComUnity platform ecosystem:
Platform Authorization Roles - Defined and managed by the platform's authorization service.
Used for security and access control (e.g., which screens, tables, or functions a user can access).
Included in the login payload (e.g.,
"roles": ["Administrator", "Staff", "User"]).Always validated server-side; the front end cannot bypass these checks.
Not available in your project's OData model. You cannot
$expandor filter them directly inUserProfile.
Application Roles (UserRoles Template) - Introduced when you add the UserRoles template to your project.
Stored in your application's data model (tables such as UserRole, joined to UserProfile and UserMenu)
Intended for business logic and segmentation (e.g., "Recipient", "VIP", "Moderator").
Relevant user roles must be manually seeded into the UserRoles table to expand user roles offered by default which include Staff and User; see the tutorial section Validate Platform Roles, Application Roles, and Permissions for detailed steps on how to do this
Fully queryable in OData:
/UserProfile?$expand=UserRoles&$filter=UserRoles/any(r: r/RoleName eq 'Recipient')- Can be customised, renamed, or extended depending on your project's requirements.Optionally, app roles can be mapped to platform roles if you want alignment, but they remain distinct.
When to use each - Use Platform Roles for securing access and enforcing permissions.
Use Application Roles for grouping users in app logic, filtering, categorisation, or applying business workflows.
Managing Users (Users Tab)
The Users tab within the App Users & Roles panel allows you to view registered users in the selected environment and manage their role assignments and account status.
Accessing and Viewing Users:
Ensure you have navigated to the App Users & Roles panel for the correct project and environment (view Accessing the App Users & Roles ).
Click on the Users tab if it is not already selected.
This tab displays a list of all individuals currently registered as users within your application for this specific environment.
Assigning Roles to a User:
You can grant users specific permissions by assigning one or more roles to their account:
Locate the desired user in the list.
Click the green plus icon (+) associated with that user row. This action will open a selection dialog or modal window.
In the dialog, select the role(s) you wish to assign to this user from the list of available default and custom roles.
Confirm your selection(s).
Note: A single user can be assigned multiple roles, inheriting the combined permissions of all assigned roles.
*(Managing User Roles definitions, such as creating custom roles, is covered in Managing Roles (Roles Tab).)
Deleting a User Account:
Action: To remove a user account permanently, locate the user in the list and click the trash icon (delete button) associated with that user.
Important Note: As per the original documentation context, please be aware that this delete functionality might be currently disabled in the interface. Verify the button's status in your Toolkit version. If enabled, a confirmation prompt will typically appear before deletion is finalized.
Password Resets:
Management of user password resets is typically handled through dedicated authentication flows or administrative tools, which may be separate from this specific
Userstab. Please refer to the relevant sections on Authentication Management or User Self-Service features if applicable.
Helpful Tooltips:
Throughout the interface, hover your mouse cursor over buttons and icons (like the green plus or trash icon) to view helpful tooltips providing brief descriptions of their functions.
By using the Users tab, you can effectively manage which roles are assigned to individual users, controlling their access levels within your application for the selected environment.
Managing Roles and Viewing Permissions (Roles Tab)
The Roles tab in the App Users & Roles panel is where you define the set of available roles (beyond the defaults) for your project environment and can view a summary of permissions assigned to each role.
Accessing and Viewing Roles:
Ensure you have navigated to the App Users & Roles panel for the correct project and environment.
Click on the Roles tab.
Here, you will see a list displaying the default roles (Administrator, Staff, User) provided by the Toolkit, along with any custom roles you have previously created for this environment.
Creating a Custom Role:
If the default roles don't meet your specific permission needs, you can create custom roles:
Click the
Add Rolebutton, typically located near the top or bottom of the roles list.A dialog box will appear prompting you to enter a name for the new role.
Type the desired name for your custom role (e.g., "ContentApprover", "FinanceManager") and confirm the creation.
Note: Once created, this custom role will be available for assignment to users (via the Users tab) and for configuring permissions in Table Security.
Deleting a Custom Role:
You can remove custom roles that are no longer needed:
Locate the custom role you wish to delete in the list.
Click the delete icon (often a trash can symbol) associated with that role row.
Note: Default roles (Administrator, Staff, User) typically cannot be deleted. This action usually applies only to custom roles you have created.
A confirmation prompt will appear to prevent accidental deletion. Confirm the action if you are sure you want to remove the role.
Caution: Deleting a role will remove it from any users currently assigned that role. Ensure you understand the impact before deleting.
Viewing Permissions Assigned to a Role (Role-Centric View):
This tab also provides a way to see which data entities a specific role has been granted access to via Table Security:
Find the role (either default or custom) in the list whose permissions you want to review.
In the Roles tab, locate the role you want to review (system role or project role). Next to the role name, click the pencil icon. The tooltip will display Edit table security, indicating that this action will open the permissions editor for that role.
This action opens the Edit table security view for the selected role. Here you will see a list of all tables/entities in your Data model displayed in a grid. Each entity is shown in the left-hand column, with corresponding permission types (Delete, Insert, Replace, Update, View, All) as columns across the top.
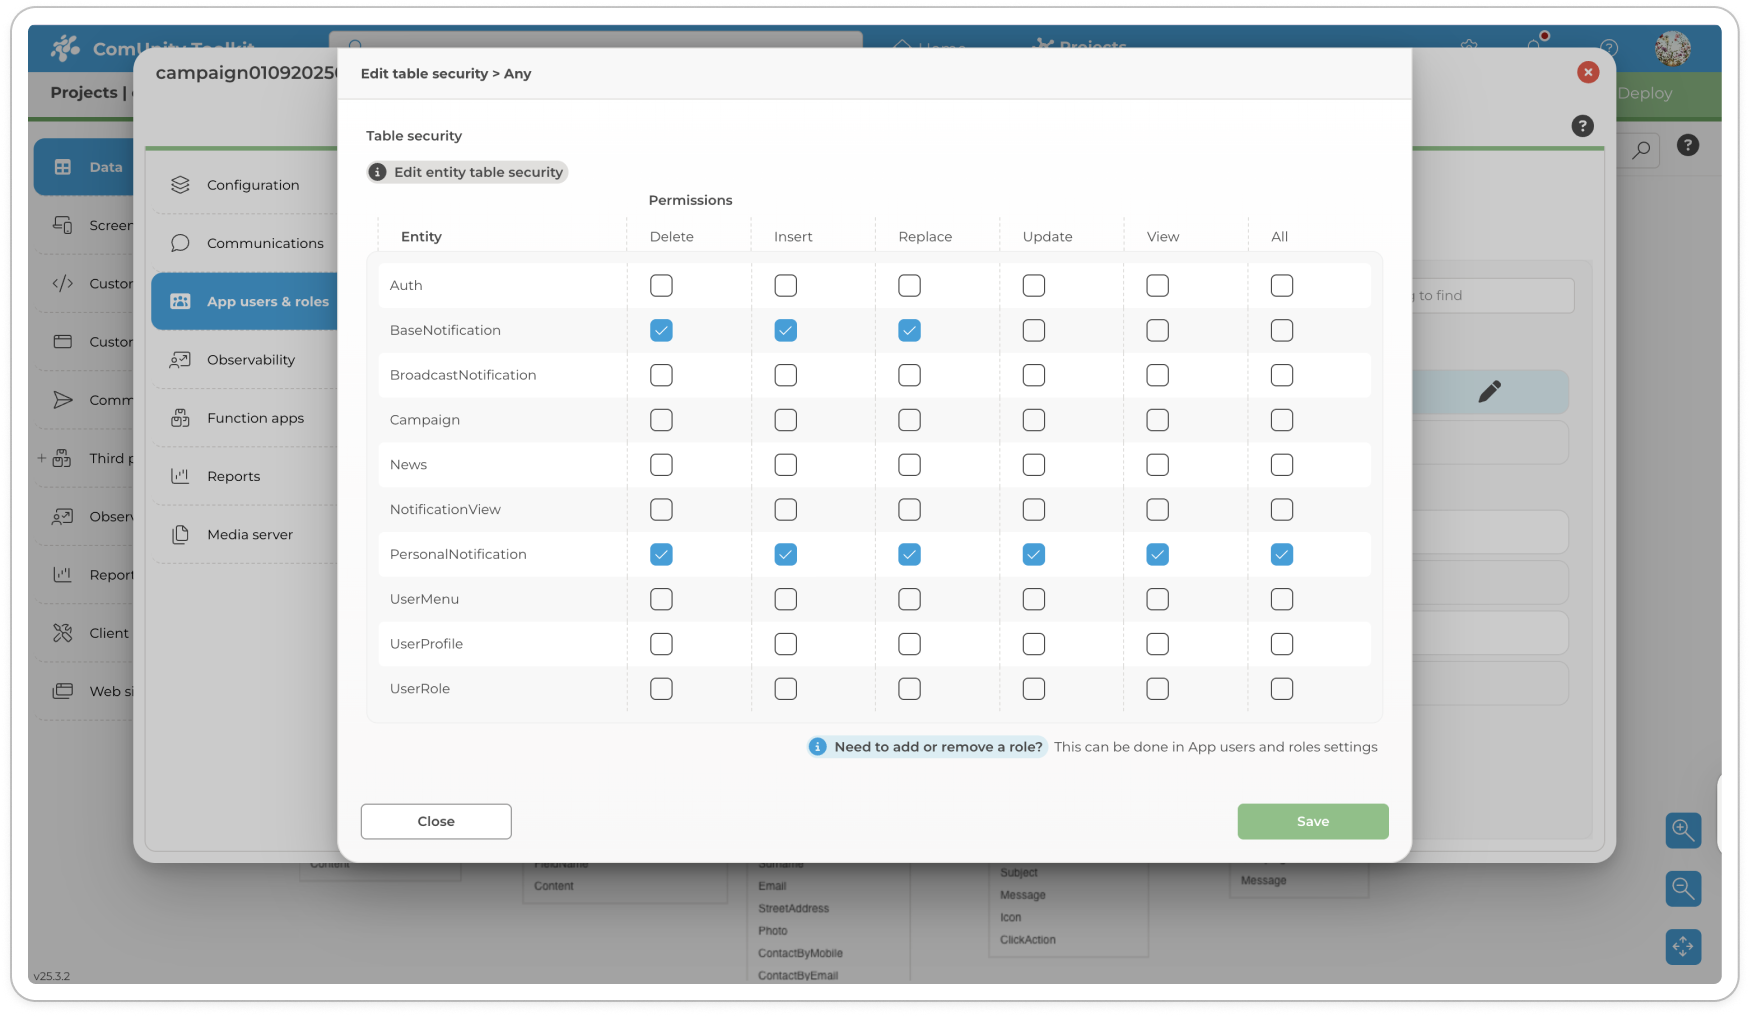
A checkmark in a box indicates that the role currently has that specific permission on the entity.
You can toggle permissions by selecting or clearing the checkboxes.
Once changes are made, click Save to apply them.
This layout gives you a clear, role-centric overview of what the selected role can do across entities and provides a direct way to update those permissions in one place.
For more detailed configuration at the entity level, refer to Setting Up Role-Based Permissions for Entities: Access Control Configuration. This guide explains how to manage permissions directly in the Table Security interface by selecting an entity in the Data Model and adjusting role-based permissions in its properties dialog.
Managing Authentication Credentials (Credentials Tab)
The Credentials tab within the App Users & Roles panel allows you to configure specific validation rules and policies that are enforced during user authentication and password management processes for the selected environment. This helps enhance security by ensuring credentials meet your organization's standards.
(For underlying concepts about how authentication works in the ComUnity Toolkit, including details on JWT and data encryption, please refer to the [Link to Authentication Concepts Documentation].)
Accessing and Configuring Credential Rules:
Ensure you have navigated to the App Users & Roles panel for the correct project and environment (see Section 2).
Click on the Credentials tab.
You will typically see a list of credential types for which you can configure validation rules, such as Cell, Email, and Plain (representing standard username/password).
To configure the rules for a specific credential type:
The interface may present the options directly, or you might need to select the credential type (Cell, Email, etc.) from the list, potentially after clicking an Add Rule Set or Configure button (refer to the specific UI elements in your Toolkit version).
Once a credential type is selected for configuration, you can adjust the following properties (Rule Sets), which are enforced server-side:
LoginMinLength: Minimum character length for a valid username/login identifier (e.g., email, mobile number).LoginMinLengthMessage: Custom error message ifLoginMinLengthfails.PasswordMinLength: Minimum character length for the plain text password.PasswordMinLengthMessage: Custom error message ifPasswordMinLengthfails.PasswordMinCapitalLetterCount: Minimum number of uppercase letters required in the password.PasswordMinCapitalLetterCountMessage: Custom error message ifPasswordMinCapitalLetterCountfails.PasswordMinSmallLetterCount: Minimum number of lowercase letters required.PasswordMinSmallLetterCountMessage: Custom error message ifPasswordMinSmallLetterCountfails.PasswordMinNumericCount: Minimum number of digits (0-9) required.PasswordMinNumericCountMessage: Custom error message ifPasswordMinNumericCountfails.PasswordMinNonalphanumericCount: Minimum number of non-alphanumeric characters (e.g., !, @, #) required.PasswordMinNonalphanumericCountMessage: Custom error message ifPasswordMinNonalphanumericCountfails.PasswordReuseProhibitCount: Number of previous passwords a user cannot reuse when changing their password.PasswordLifetimeDays: Number of days a password remains valid before requiring a change.PasswordLifetimeDaysMessage: Custom error message displayed when the password lifetime expires.MaxFailedLogins: Maximum number of incorrect login attempts before the account is locked.PinSlidingWindowSecsMessage: Custom error message related to session expiration based onPinSlidingWindowSecs(the exact mechanism may be detailed elsewhere).PasswordIntruderDelaySecs: Delay (in seconds) enforced between login attempts after suspicious activity is detected.PasswordIntruderDelaySecsMessage: Custom error message shown when the intruder delay is active.PinRequiredMessage: Custom error message indicating that a One-Time Password (OTP) is required for login.SmsPinRazorTemplate: Allows customisation of the SMS template used for sending OTPs (using Razor syntax).DisableAutoRegistration: If set, prevents the automatic creation of a defaultUserProfilerecord upon first login.
By carefully configuring these rules on the Credentials tab, you can enforce strong authentication policies tailored to your project's security requirements.
Recommendations and Summary
To effectively manage user access and security using the App Users & Roles panel and related features like Table Security, consider the following best practices:
Recommendations
Leverage
Registered Usersfor Broad Access: Use theRegistered Usersgroup as a shortcut in Table Security (see Table Security Documentation) when you need to grant common permissions (like read access to shared resources) to all logged-in users efficiently.Use
Anonymous UsersCautiously: Grant permissions to theAnonymous Usersgroup sparingly, primarily for public-facing data access. Restrict these permissions to read-only (Read) operations whenever possible to prevent unauthorised data modification.Employ Custom Roles for Granularity: For sensitive data or specific workflows, avoid overly broad permissions. Create specific Custom Roles (via the
Rolestab) and assign fine-grained CRUD permissions explicitly using Table Security.Verify Permissions from Multiple Views: Regularly cross-reference permission configurations to ensure they are set as intended. Use:
The Role-Centric View (accessible via the
Rolestab, as described in Section 5) to see all entities a specific role can access.The Table-Centric View (accessible when configuring Table Security for a specific entity, see Table Security Documentation) to see all roles/groups that have access to that particular entity. Reviewing both helps prevent misconfigurations.
Summary of Role Types and User Groups
For quick reference, here are the types of roles and groups used for permission management:
Administrator
Default role: Full system access and control.
Assign to users via Users tab.
Staff
Default role: Internal contributors, data managers.
Assign to users via Users tab.
User
Default role: General authenticated user access.
Assign to users via Users tab.
Custom Roles
Roles you define for specific project needs (e.g., "Auditor").
Create/Delete via Roles tab; Assign via Users tab.
Registered Users
v25.1 Group: All authenticated users (Admin, Staff, User, Custom).
Used as a target in Table Security.
Anonymous Users
v25.1 Group: Unauthenticated users accessing public data.
Used as a target in Table Security.
Export to Sheets
Version Information:
The
Registered UsersandAnonymous Usersgroup categories were introduced in ComUnity Toolkit version 25.1. Ensure you are using this version or later to utilise these features. These groups are available for permission assignment within Table Security configurations for each environment.
By following these recommendations and understanding the different roles and groups, you can effectively utilise the ComUnity Toolkit's features to manage user access securely and efficiently according to your project's requirements, leveraging the settings available in the App Users & Roles panel.