Build a Simple Blog App: The Beginner's Guide to ComUnity Development
In this tutorial, we focus on building a blog application from scratch on the ComUnity Platform. You'll start by developing your own data model, giving you full control over its customisation and a clear understanding of its structure. As the tutorial progresses, we'll guide you through extending this data model, enhancing your application with additional features and functionalities. This approach provides a thorough learning experience for developers eager to understand and utilise the full capabilities of the ComUnity platform. By the end of this guide, you’ll not only have a bespoke blog application but also the skills to extend and improve applications within this dynamic platform.
What you will learn?
Through this hands-on guide, you'll learn to:
Define your data model with entities like articles and comments.
Configure metadata for user access, pages, and navigation.
Extend the data service for notifications and external data integration.
Publish your data service for use in the ComUnity platform.
This tutorial is perfect for developers familiar with C# , WCF Data Services, Entity Framework, and OData who want to explore building applications on ComUnity.
ComUnity Developer Toolkit Environment:
The ComUnity Developer Toolkit is hosted in Azure and accessible at: https://toolkit.comunity.me/
Prerequisites:
Internet connection
ComUnity user account with appropriate access (contact ComUnity support)
C# programming skills
Understanding of WCF Data Services, Entity Framework, and OData
Visual Studio 2022 (Community, Professional, or Enterprise)
Changes made to the Data Service require you to Build your app to publish these changes. Subsequently, when modifications are made to screens, you must Launch your app to update the application metadata. For further details, see Build and Launch.
Assets:
This section contains various assets which are used in the tutorial.
Blog Application Features:
This tutorial builds a simple blog app with the following features:
Users can create, edit, and publish articles.
All users can view articles and add comments.
Authors can tag blog articles and readers can view, and comment on tagged articles.
Walkthrough
Data Model Configuration: Define the entities and relationships for your blog application.
Data Service Publishing: Publish your defined data model and make it accessible on ComUnity.
Metadata Configuration: Set up access rights, pages, and navigation for your blog app.
Data Model
The following diagram shows the data model that will be created for the example application.

Data Service Project Development
The ComUnity platform leverages the Entity Framework Code First approach for the Data Service project, which forms the backbone of your application's data model. The Platform Toolkit Application streamlines the process of creating your data services project. It allows for the data model to be outlined through configuration data, simplifying the development process. Once your data model is defined, the Platform Toolkit Application will take charge, automatically generating, building, and publishing the data service project to IIS. This section will guide you through these steps, ensuring a smooth transition from concept to a functioning component of your application.
Data Model Configuration
To configure your Data Model, follow these steps:
Login into the ComUnity Developer Toolkit.
Create a project using the Blank Project template with a unique title, an illustration is shown in the following diagram:

Create a new Blank Project in the ComUnity Developer Toolkit After successfully creating your project the Toolkit will successfully redirect you to your project structure. The diagrams below show a the structure of the created Data Model of your project:
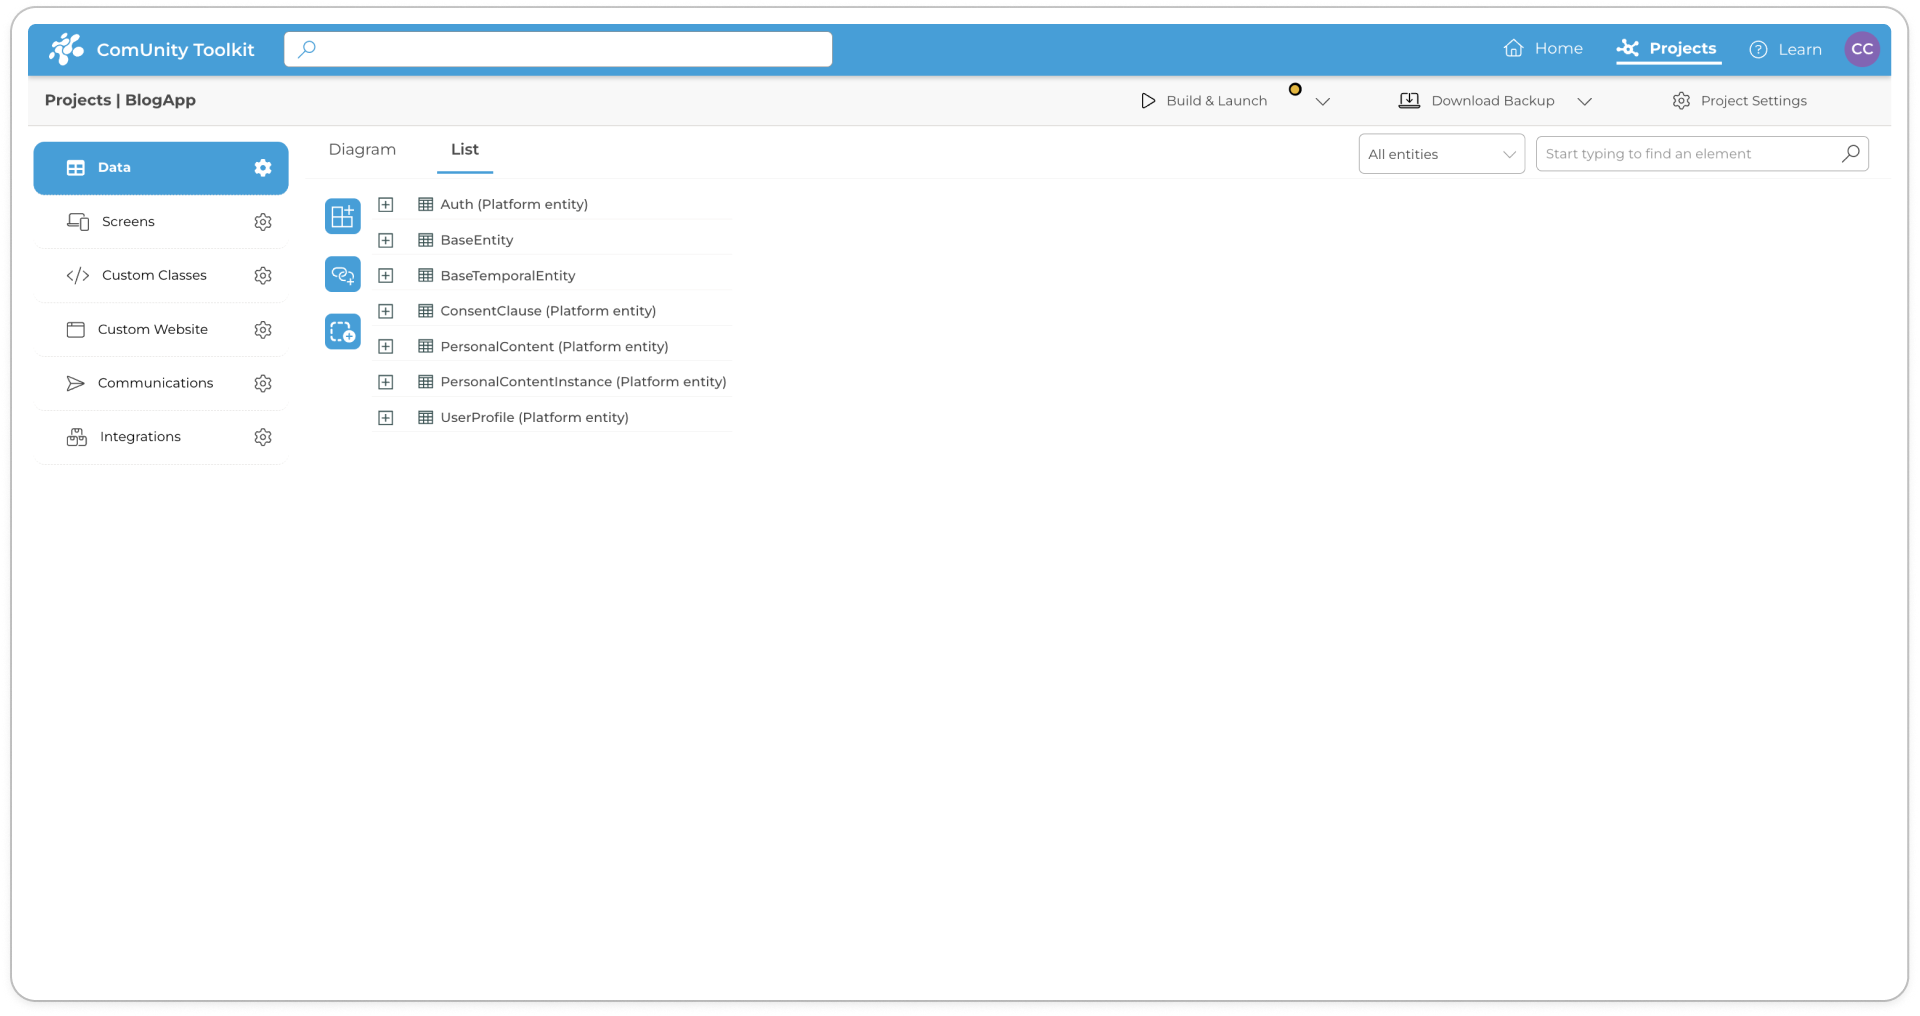
The Data Model of a newly created BlogApp shown as a List 
The Data Model of a newly created BlogApp shown as a Diagram In this step we will create the custom entities shown in the Entity Relationship Diagram (ERD) of the application above and populate them with field properties, to get started:
Navigate to the "Data" section within the Toolkit. Once there, locate and click on the "List view" tab. This area allows you to view and manage the entities within your data model.
Locate and click the "Add new entity" icon to initiate the creation of a new entity.
In the "Entity Name" field, enter
Postas the name of your new entity.Confirm the creation by clicking the "Add Entity" button. This action will successfully create the "Post" entity within your Data Model.

Adding the Post entity to the Data Model 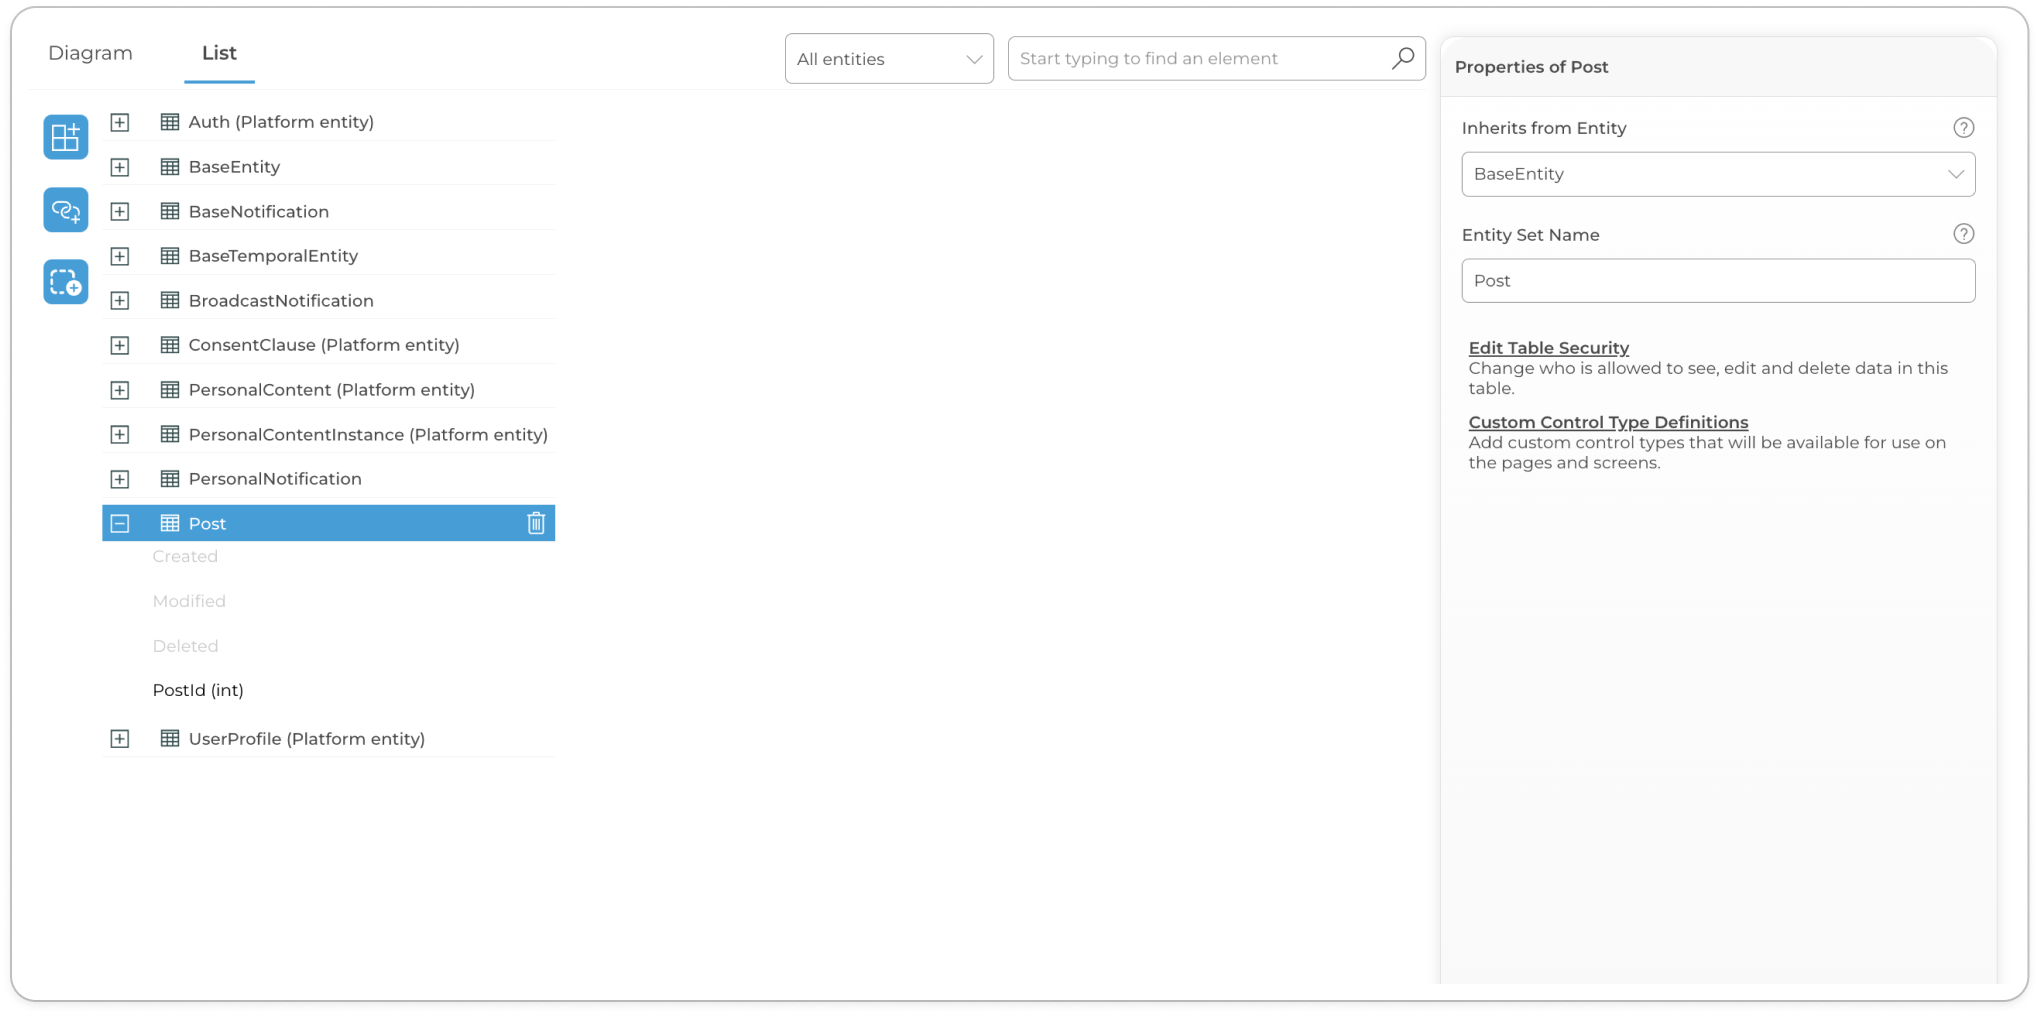
Default attributes or properties of a newly created Post entity To add custom properties to the "Post" entity, right-click on any existing property, follow these steps:
Expand the "Post" entity to reveal its properties by clicking the "+" sign next to the entity's name.
To add a new property, click on any existing property within the "Post" entity. A modal will appear, offering you the options to "Add a property above" or "Add a property below" the selected property. Select a single option from these choices. Refer to the screenshot provided for guidance:

Add properties to an entity In the "Add new property" modal that pops up, enter the desired property name. Finalise this action by clicking the "Save" button, as illustrated in the diagram below. Note that the Table in step 5 contains an exhaustive list of all the entities required for the application and their relevant properties.

After saving, select the newly added property to customise it further in the Properties Editor. For example, we have adjusted the "Summary" property by setting its data type to 'String' (which is the default) and restricting the "Max Length" to 256 characters, as shown in the subsequent screenshot.

Click "Save" to apply these specifications and repeat the steps specified above using the data specified in the table below:
EntityPropertiesData TypesRulesRequiredDefault ValuePost
Title
string
Max Length = 64
Checked
-
Summary
string
Max Length = 256
Checked
-
Body
string
-
Unchecked
-
Publish
bool
-
Checked
false
Tag
Name
string
Max Length = 32
Checked
-
Icon
string
Max Length = 50
Unchecked
-
Comment
Detail
string
-
Checked
-
In this step, we'll establish Table Security rules for the entities we've previously created. These rules are crucial as they determine who has the permissions to view, edit, and delete data within the table linked to each entity. Follow the steps below to configure Table Security rules for the "Post" entity:
Navigate to the List view of the entities in your Data Model
Locate and select the "Post" entity from the list. This action will activate the Properties Editor specifically for the "Post" entity, allowing you to modify its settings.
With the "Post" entity selected, look for and click on the "Edit Security" option. This action will open the "Table Security for Post" modal.
Within the modal, you will see various permissions that can be enabled or disabled for different roles. Refer to the image below for the desired output settings for the "Post" Entity. Adjust the permissions by checking (to grant) or unchecking (to revoke) the relevant boxes for each role:

After configuring the security settings for the "Post" entity, repeat the same steps for each entity you have added to the Data Model. Select the entity, click on "Edit Security," and adjust the permissions as necessary, ensuring comprehensive security coverage across all entities.
In this step we will create associations of the entities we created in the step above, lets link the User Profile to the Post entity, to get started:
Navigate to the List view of the entities in your Data Model
Select the UserProfile entity
Click the icon to add an association, in the Add new entity link you must specify the from and to entities of your association for which in the case the from entity is the UserProfile and the to entity is Post and then click the Save button
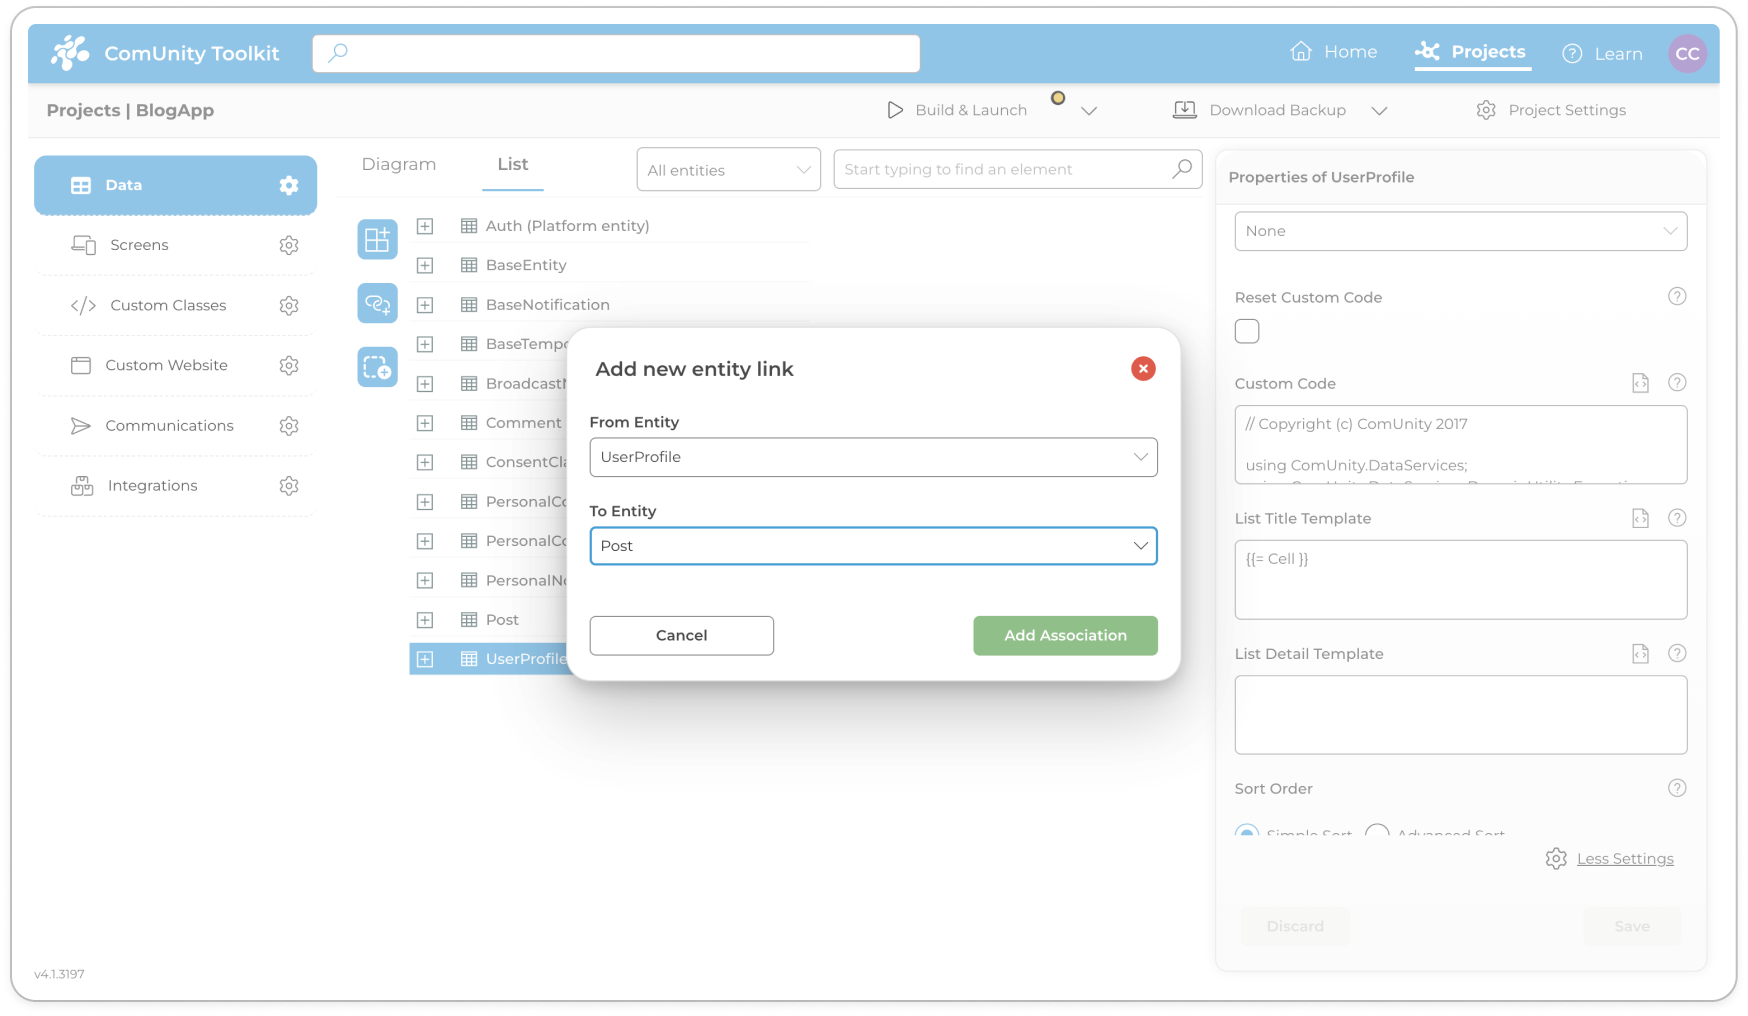
To view the association between UserProfile and Post entities created in the previous step, simply expand the collapsible UserProfile in the list. You'll see the Post association listed beneath it, indicating their connection.
Select the association to configure its properties in the Properties Editor, in this case you set the From Relationship to 1(One) and the To Relationship to *(Many) and click the Save button to persist your settings.
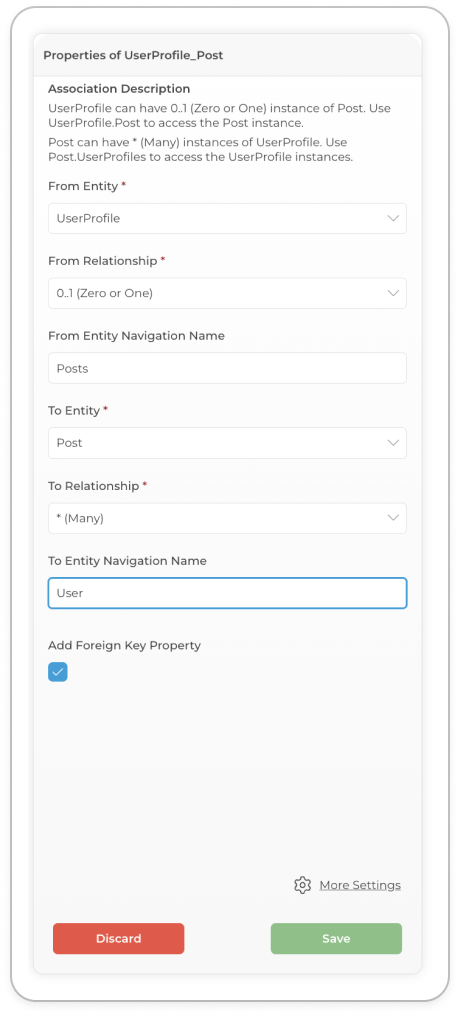
Click Save and repeat the steps specified above using the relationships specified in the table below and ensure that the field "Add Foreign Key Property" is checked for all associations you create.
From EntityTo EntityRelationship TypeFrom Entity Navigation NameFrom RelationshipTo Entity Navigation NameTo RelationshipUserProfile
Post
One is to Many
Posts
Many
User
0..1
UserProfile
Comment
One is to Many
Comments
Many
User
0..1
Post
Tag
Many to Many
Tags
Many
Posts
Many
Post
Comment
One is to Many
Comments
Many
Post
0..1
Data Service Publishing
The ComUnity Developer Toolkit streamlines the development process by automatically provisioning necessary resources on Microsoft Azure and constructing your Data Service project based on the defined data model. This integration includes executing data migrations for existing databases and deploying your project to Internet Information Services (IIS) following a successful build. However, it's crucial to note that any alterations to the data model, custom classes, or virtual entities necessitate a project rebuild to avoid data loss and maintain application consistency, to learn more view Build and Launch your project.
When viewing your application in the browser you will be redirected to the Accept Terms, after clicking the "ACCEPT TERMS" button users are redirected to the authentication screens:

Metadata Configuration
In this section of the tutorial, we'll focus on how metadata is utilised to design the application's navigation and its pages. You'll learn how to create various screens for key functionalities, including:
Viewing all published articles.
Browsing articles categorised by tags.
Creating, editing, and tagging posts.
Editing user profiles.
Adding comments to articles.
Admin functions like adding or removing tags, editing all articles, and managing comments (including deletion).
We'll also delve into setting up navigation items. These links are essential for connecting the pages and defining the application's flow. They play a crucial role in forming simple pages containing lists and in structuring the application menus.
Let's create the main screens that exist in the app, the app requires the following screens:
My Articles - a screen allows users to view all articles they created
Add Article - a screen that allows users to add blog articles
Edit Article - a screen that allows users to edit the blog articles they created
All Articles - a screen that allows users to view all published blog articles
View Article - a screen that allows users to view a single blog article and navigate to an Add Comment
Add Comment - a screen that allows users to add comments to a blog article
The diagram below shows the hierarchical structure of the aforementioned screens:

My Articles screen
Data Entry Screens are a powerful feature of the Toolkit that automate the creation of user interfaces for interacting with database entities. By simply selecting an entity, the Toolkit generates a suite of screens allowing users to view all items associated with that entity, inspect details of individual items, and update information as needed. This functionality is particularly useful for applications requiring dynamic content management, such as managing articles or blog posts. The "My Articles" screen will comprise a group of screens enabling users to create blog posts, view their posts, and edit them created from Data Entry Screens. Additionally, these screens will be further customised to incorporate the functionality of adding Tags, enhancing the organisation and searchability of content. To create the My Articles screen and its child screens, follow these steps:
In the Toolkit, find and click on the "Screens" menu item located in the sidebar. All screens which exist in your application will be displayed in the Screen View.
Select the any of the top-level screens , such as "Administration" and click the three-dot-button adjacent to the selected screen, then click "Add data screens above" as shown below:

Adding Data Entry Screens above Administration screen In the "Add data entry screens" modal, use the Entity dropdown to choose the "Post" entity. This selection informs the Toolkit of the specific entity it should use to generate your screens.

Select an entity for your Data Entry Screens 
Desired layout after adding Data Entry Screens With the data screens generated, we will proceed on to customising and configuring each screen to align with the "My Articles" concept. This involves setting titles, adjusting properties, and ensuring that the layout and functionality meet your requirements for content management:
My Articles > Post screen
Select the Post screen in the Screen View, then update the Title of the screen in the Properties Editor from "Post" to "My Articles" as shown in the screenshot below:

In the Properties Editor set the value of the field Icon to
cog.Click the Save button to persist your changes.
Click and select the List screen control in the Screen Structure to activate its Properties Editor, and set the properties outline in the table below:
PropertyValueDescriptionData Path
/UserProfile(guid'{{=userguid}}')/Posts
This property defines the specific endpoint or route for accessing posts associated with a user's profile in the application. The dynamic portion,
guid'{{=userguid}}', is a placeholder that gets replaced with the actual globally unique identifier (GUID) of the user at runtime. This ensures that the data fetched or submitted via this path is precisely linked to the correct user profile, facilitating targeted retrieval or update of posts under a specific user's account. It's essential for operations like displaying a user's articles or submitting new ones under their profile.Item Title
{{= Title}}
The
Item Titleproperty specifies the template for dynamically displaying the title of each item, such as a post or article, retrieved from the data source. By using the placeholder{{= Title}}, the system automatically inserts the title of each respective post into the layout or list where this template is applied. This dynamic binding ensures that the displayed title matches exactly what is stored for each post in the database, providing a direct and accurate reflection of the content to the user.Item Detail
{{ = Summary}}
This property sets the template for presenting a brief description or summary of each item, like an article or blog post. The placeholder
{{= Summary}}is used to dynamically insert the summary content of each post into the display interface. This approach allows for a concise overview of each post's content to be presented alongside its title, offering users a snapshot of what the post is about before deciding to read further. It enhances the usability of lists or feeds by giving context to each listed item, making it easier for users to navigate through content.Click the Save button to persist your changes.
My Articles > Add Post Record screen
Add Post Record screen
Click on the "Add Post Record" screen in the Screen View to activate its supported Properties Editor, then set the properties outlines in the table below:
PropertyValueDescriptionTitle
Add Article
This property defines the heading or title of the screen in the application.
Target URL
/UserProfile(guid'{{=userguid}}')/Posts
The
Target URLproperty specifies the endpoint or API route the application will call to perform a specific operation, in this context, to submit or associate new posts with a user's profile. The dynamic part of the URL,guid'{{=userguid}}', is replaced at runtime with the actual GUID (Globally Unique Identifier) of the user, ensuring that the new posts are correctly linked to the user's profile. This URL pattern facilitates direct access to a subset of data related to the user, specifically their posts, enabling a seamless data submission process.Click and select the Auto Inputs screen control in the screen screen structure to activate its Properties Editor, and set the properties outline in the table below:
PropertyValueDescriptionExclude
Tags,User,Comments
Comma delimited list of Post entity navigations to exclude from Auto Input control
Click the Save button to persist your changes.
My Articles > PostEditPage screen
Select the "PostEditPage" screen in the Screen View, then update the Title of the screen in the Properties Editor from Edit Record to Edit Article as we did in the previous step.
Edit the Target URL field from /Post to:
This request is intended to perform a partial update on a specific post within the collection of posts associated with a particular user profile, identified by a GUID.
Click Save to persist your changes.
Click and select the Auto Inputs screen control in the screen screen structure to activate its Properties Editor, and set the properties outline in the table below:
PropertyValueDescriptionExclude
Tags,User,Comments
Comma delimited list of Post entity navigations to exclude from Auto Input control
Click Save to persist your changes.
Click the "Edit Article" screen to activate its supported Properties Editor and carefully observe the "Name" property within the Properties Editor. In the example provided below, the name of the screen is identified as "1PostEditPage".

Proceed to your "My Articles" section and select the "List" option to continue. Within the Properties Editor for the "List" screen, locate the section for setting the Target URL. Update the Target URL field with the following link:
The Target URL you've set,
1PostEditPage?postId={{= PostId }}, plays a crucial role in linking users from one part of your application to a specific editing page for articles, utilising a dynamic parameter to provide a customised experience.
To view your changes, either launch your app or, if it's already open, reload the page twice.
All Articles screen
This screen will allow users to view all published blog articles.
To create the All Articles screen, follow these steps:
Select the any of the top-level screens , such as "My Articles" and click the three-dot-button adjacent to the selected screen, then click "Add screen above" as shown below:

When the Add a new screen window appears, set Navigation page as the Screen type and set the Title to "All Articles" as shown in the screenshot below:
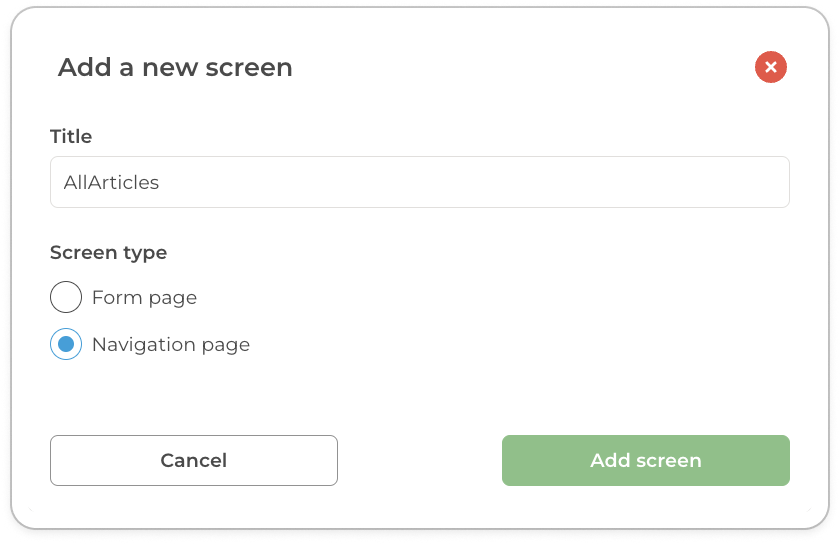
Drag and drop the "List" form control from the Screen Controls onto the All Articles' screen.
Position the List control in the Screen Structure, refer to the provided image for the desired layout.

Configure the List control
Select the List Control: Click on the List control to activate its Properties Editor.

Active List Control in the AllArticles screen's structure Set the properties: The table below shows the properties and values you need to set for the active List. Click More Settings to view settings which are hidden by default
PropertyValueDescriptionIcon
cogs
This property specifies an icon to be used in conjunction with the screen or page title, enhancing the visual appeal and providing a visual cue about the action or content associated with the title.
Data Path
/Post
Defines the endpoint URL (
/Post) for retrieving data from the backend. This path is used to construct the full oData query URL for fetching data, specifically targeting the "Post" resource in the database.Query
Publish eq true and Deleted eq null
This property sets a filter condition for the oData query, instructing the system to retrieve only those records where the
Publishattribute istrue. This ensures that only published items are fetched from the database.Item Title
{{= Title }}
Specifies the template for displaying each list item's title, dynamically inserting the
Titleproperty of the data item. This allows for a flexible display of titles based on the data retrieved.Item Detail
{{= Summary }} Author: {{= User/Name }} {{= User/Surname}}
Sets the template for displaying detailed information about each list item. It combines static text with dynamic data fields, showing the item's
Summaryfollowed by the author's full name, which is constructed from related user data (Name and Surname).Target URL
LINK:AllArticlesList_PageItem?postId={{= PostId }}
Defines a template for constructing URLs to link to detailed article views. This property dynamically inserts the
PostIdof the current item into the query parameter of the URL, facilitating navigation to a detailed view page for each article.Item Aside
{{= Created }}
This property defines what is displayed in the aside section of each list item, in this case, the creation date of the article. The template dynamically inserts the
Createddate, formatting it day-month format without the year.
To view your changes, either launch your app or, if it's already open, reload the page twice.
In the next step, we'll guide you through creating the "AllArticlesViewPage" mentioned in the Target URL.

View Article screen
To create the View Article screen, follow these steps:
Select the All Articles screen created in the previous step.
Select the Screen Structure and then click on the List we implemented in the "All Articles" to activate its supported Screen Controls.

Drag and drop the "Form" screen control from the Screen Controls onto the activated List, the desired output is such that the Form control is then nested as Item 1 in the All Articles screen is shown below:

Select the Item 1: Click on the Item 1 in the Screen View to activate its Screen Structure, Screen Controls and Properties Editor.
Set the properties outlined in the table below, the desired configuration is also shown below:

Settings for View Articles screen PropertyValueDescriptionTitle
View Article
This property specifies the title of the screen or page within the application. Setting this value to "View Article" indicates that the screen is dedicated to displaying an article's content, providing users with a clear understanding of the page's purpose. The title is typically displayed at the top of the screen or in the browser tab, serving as a visual indicator of the current view.
Target URL
/Post({{= postId }})
This property defines the specific endpoint or URL to which a user will be directed or from which data will be retrieved. The value
/Post({{= postId }})utilises a dynamic parameterpostIdthat is replaced with the actual ID of a post when generating the URL. This enables the application to fetch or display information specific to a particular post. The use of{{= postId }}within the URL structure indicates that this is a templated part of the URL, which will be substituted with a real post ID at runtime, allowing for dynamic navigation or data retrieval based on the user's interaction or selection.Click the Save button to persist your changes.
Click on the "View Article" screen to re-select it. This action will activate the "Screen Structure" section for further modifications.
Build its Screen Structure Step-by-Step:
Drag and drop three Paragraph screen controls into the View Article Screen
Using Templated Markdown populate each Paragraph screen control Title, Summary and Body.
Screen ControlValueParagraph
## Title: {{= Title}}Paragraph
__Summary: {{= Summary}}__Paragraph
{{= Body}}To add an optional "divider.png" image, drag and drop the Image screen control into the screen a. Click the Image control to activate it in the Properties Editor then upload this image here in the Image Digest field.
Note: Add each item individually. This ensures correct placement and order.
Click "Save" after adding each item. This saves your progress and avoids losing changes.

Adding relevant screen controls 
Upload image
To view your changes, either launch your app or, if it's already open, reload the page twice.
In the next step, we'll guide you through adding functionality to add and view comments.
Add Comment screen
To create the Add Comment screen, follow these steps:
Under Additional Screens, select 'User Profiles' and click the three-dot-button adjacent to the selected screen, then click Add screen as shown below:

When the Add new window appears, choose Form Page as the page type and set the Title to Add Comment:

Select the Add Comments screen created in the previous step, to activate its Screen Structure.
Drag and drop the "Input" and "Button" screen control from the Screen Controls onto the Screen Structure:

Click on the "Input" control to activate its Properties Editor, then set the properties outlined in the table below:
PropertyValueDescriptionProperty Name
Detail
Specifies the input label
Click on the "Button" control to activate its Properties Editor, then set the properties outlined in the table below:
PropertyValueDescriptionButton Text
Add
Specifies the button label
Verb Name
Post
Specifies the HTTP method used for the form action. In this case, "Post" indicates that the form will submit data to the server to create a comment.
Document Template
{"Detail":"{{= Detail }}", "User@odata.bind":"UserProfile(guid'{{=userguid}}')"}
Specifies the structure of the data payload for the POST action, including dynamic values to be included in an OData query. The
Detailkey is populated with the specific detail information, and theUser@odata.bindkey binds the document to the user profile using the user's GUID.To implement functionality to add a comment to a page, click the View Article Page in the Screen View to activate its Screen Structure and Properties Editor.
Drag and drop the "List" screen control from the Screen Controls and place it below the divider.
Click on the List control to activate its supported Screen Controls.
Drag and drop the "Single Item" and the "Entity Items" screen control from the Screen Controls onto the activated List, the desired output is shown below:

Click on the "Single Item" control to activate its supported Properties Editor, then set the properties outlines in the table below:
PropertyValueDescriptionTitle
Add Comment
This property sets the title or heading of the interface screen where users can add a new comment. By naming the screen "Add Comment," it clearly informs users that they are in the section of the application dedicated to submitting their feedback or thoughts on a particular topic or post. This title helps enhance user navigation and usability by providing a clear context for the action they are about to perform.
Icon
svg/sdk/plus-circle/Bootstrap/regular
This property specifies an icon to be used in conjunction with the screen or page title, enhancing the visual appeal and providing a visual cue about the action or content associated with the title. The value
svg/sdk/plus-circle/Bootstrap/regularpoints to a specific icon within a structured library or SDK, indicating the use of a "plus-circle" icon from the Bootstrap icon set in its regular style. This icon, often symbolizing the addition of new items or content, is prefixed to the title, offering an intuitive understanding that the user is about to engage in a creation or addition process, such as adding a new comment, post, or item within the application. The use of this icon helps to visually distinguish the action or page, making the user interface more user-friendly and accessible.Data Path
/Comments
The
Data Pathproperty specifies the endpoint or API route used by the application to send or retrieve comments data. The value/Commentsindicates that this particular path is dedicated to handling operations related to comments, such as posting new comments or fetching existing ones. It serves as a direct link to the comments resource on the server, ensuring that data can be accurately accessed or submitted by the application.Page
./AddComment
This property defines the relative path to the page within the application where users can add a new comment. The value
./AddCommentpoints to a specific screen or component designed for comment submission, indicating that this page contains the necessary interface elements (such as text input fields and submit buttons) for users to write and post their comments. The "./" prefix suggests that the path is relative, implying that the location of theAddCommentpage is within the same directory level as the reference point in the application's file structure.Click on the "Entity Items" control to activate its supported Properties Editor, then set the properties outlines in the table below:
PropertyValueDescriptionEntitySet/Navigation
/Comments
This property indicates the specific EntitySet or navigation path used within the application's data model, particularly in the context of OData services or similar API structures. The value
/Commentsdesignates the targeted dataset or resource for operations, in this case, comments. It functions as a reference to the collection of comment entities, enabling the application to perform actions such as querying, adding, updating, or deleting comment records. By specifying/Comments, the property clearly defines the path for accessing or interacting with comment data stored in the backend. This allows for efficient data manipulation and retrieval, ensuring that the application can dynamically handle user interactions related to comments, such as displaying a list of comments or submitting new ones.To view your changes, either launch your app or, if it's already open, reload the page twice.
Articles By Tag screen
To create the Articles By Tag screen, follow these steps:
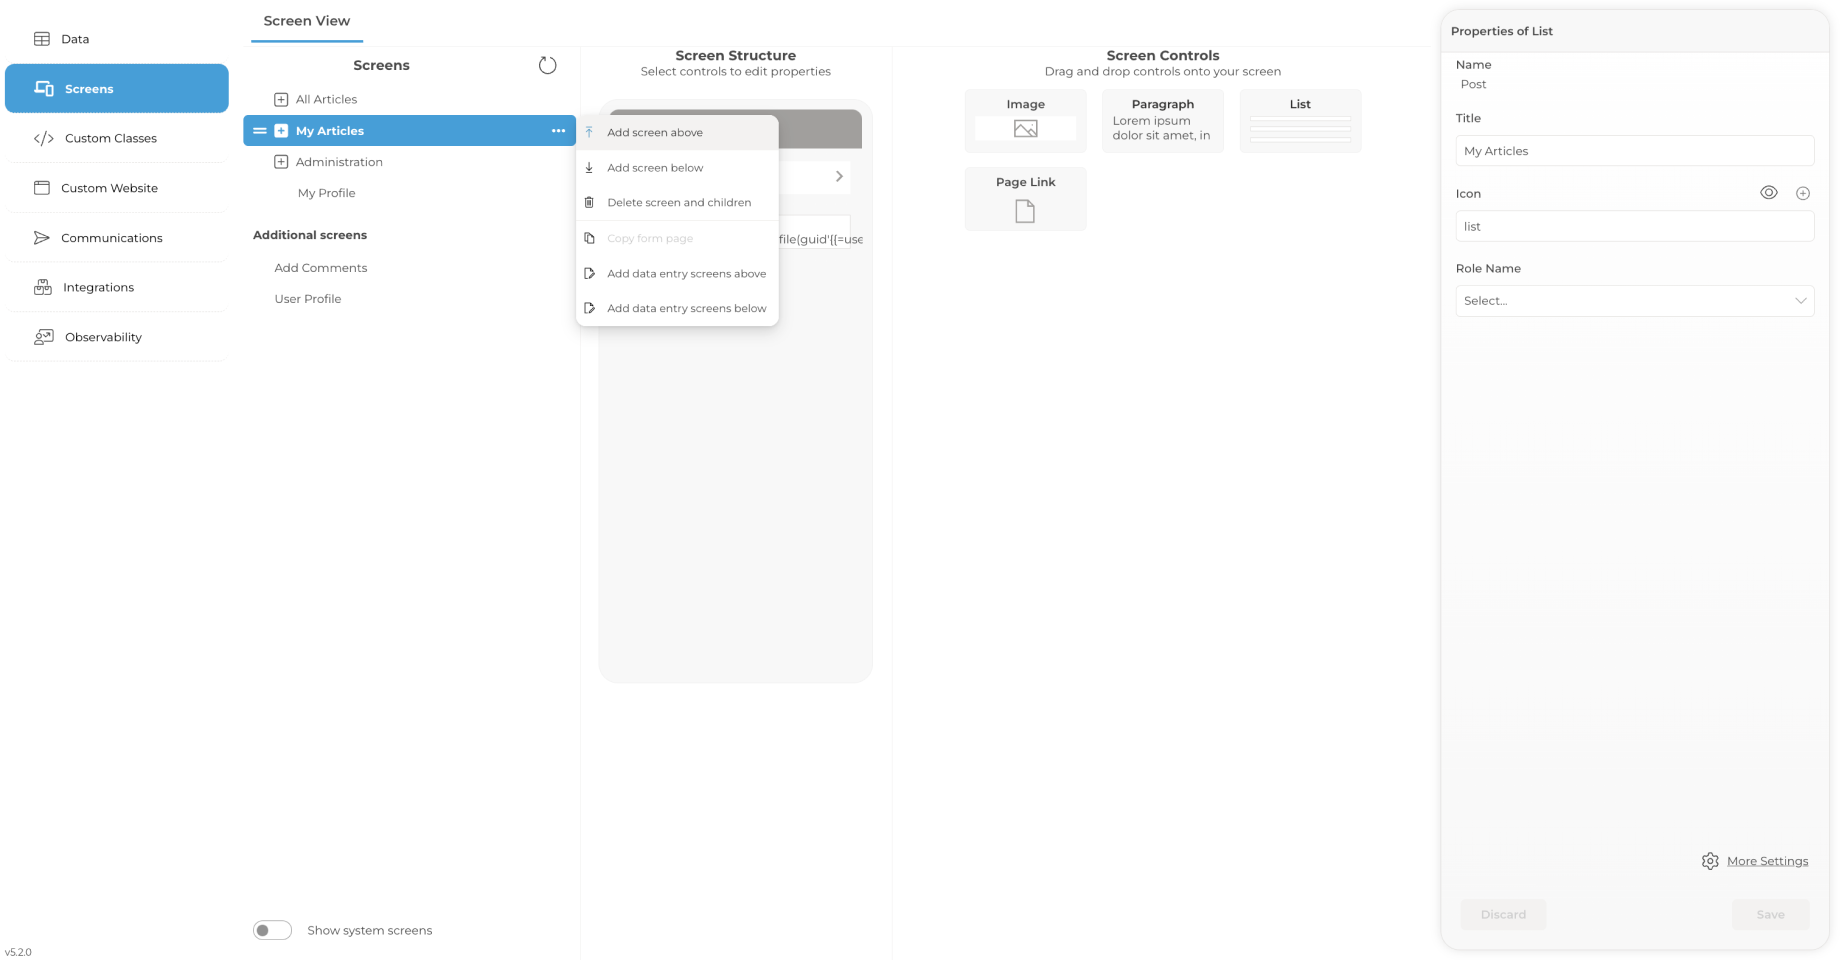
Select the any of the top-level screens , such as 'My Articles'. and click the three-dot-button adjacent to the selected screen, then click Add screen as shown below:
When the Add a new screen window appears, choose Navigation page as the page type and set the Title to Articles By Tag as shown in the screenshot below:

Click and select the Articles By Tag screen in the screen view to activate its Screen Structure:
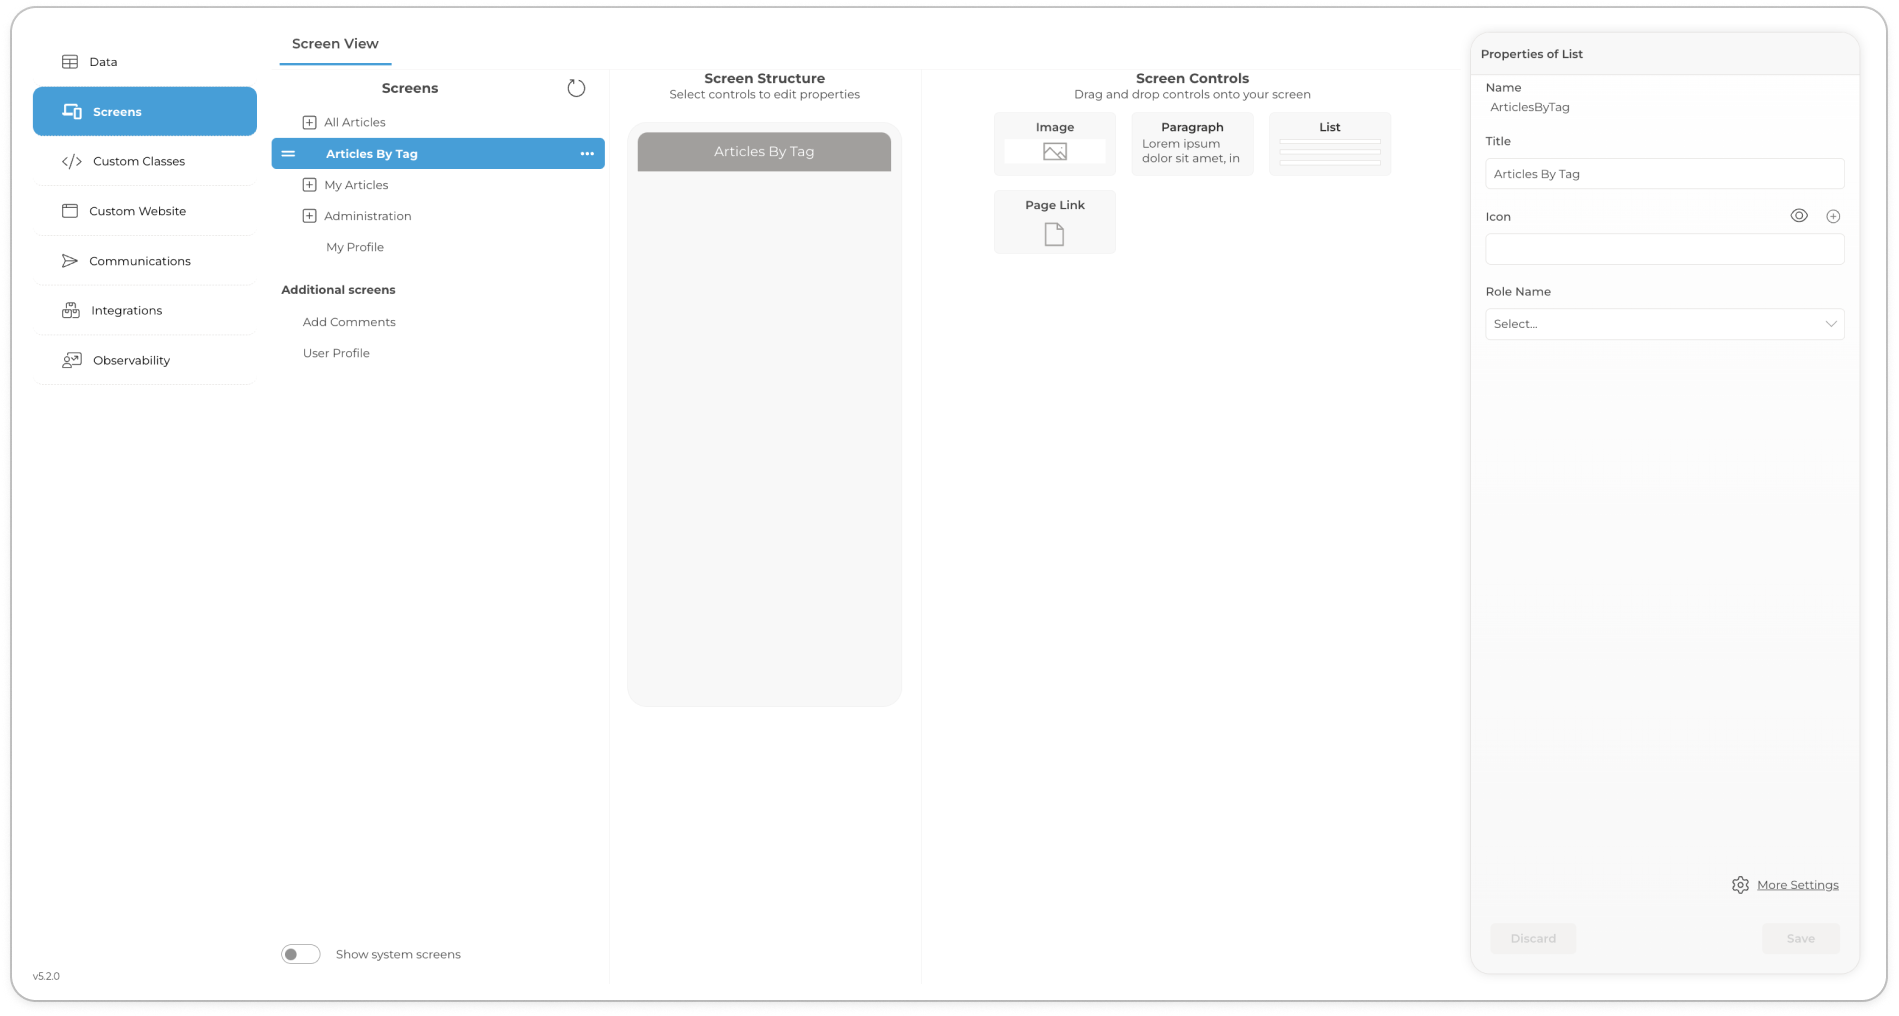
In the Properties Editor set the value of Icon to
ticket.Drag and drop the "List" form control from the Screen Controls onto the Articles By Tag screen structure and set its layout type to "Grid".
Click on the List control to activate its supported Properties Editor, then set the properties outlines in the table below:
PropertyValueDescriptionData Path
/Tag
This property designates the specific endpoint or route within the application's backend from which tag-related data can be accessed or manipulated. The value
/Tagsignifies that this path is dedicated to operations involving tags, such as retrieving all tags, adding a new tag, or editing existing tags. It serves as a direct link to the tag resource, facilitating seamless interaction with the tag data stored in the database.Item Title
{{= Name}}
This property specifies the name of the Tag by default only the Tag icon is shown
Target URL
LINK:TaggedArticles?tagId={{= TagId }}
This property defines the URL to which a user will be directed or the application will navigate when a particular action is taken, often linked from a UI element like a button or a hyperlink. The value
LINK:TaggedArticles?tagId={{= TagId }}constructs a dynamic URL for navigating to a page that displays articles associated with a specific tag. The{{= TagId }}portion is a placeholder that gets replaced with the actual ID of the tag, allowing the application to fetch and display articles tagged with that specific identifier. This dynamic linking method enables a fluid and context-sensitive navigation experience within the application, directly connecting users with the content relevant to the selected tag.Click the Save button to persist your changes
Click on the List control to re-select it and activate its supported Screen Controls:

Drag and drop the "Navigation Page" screen control from the Screen Controls onto the activated List, the desired output is shown below:

Item 1 is nested under Articles By Tag screen In the next step we will configure Item 1 to be the Tagged Articles screen.
Tagged Articles screen
To configure the Tagged Articles screen created in the previous step, follow these steps:
Click and select the Item 1 screen in the Screen View, to activate its supported Properties Editor and set the Title to "Tagged Articles":

Setting the page Title of Item 1 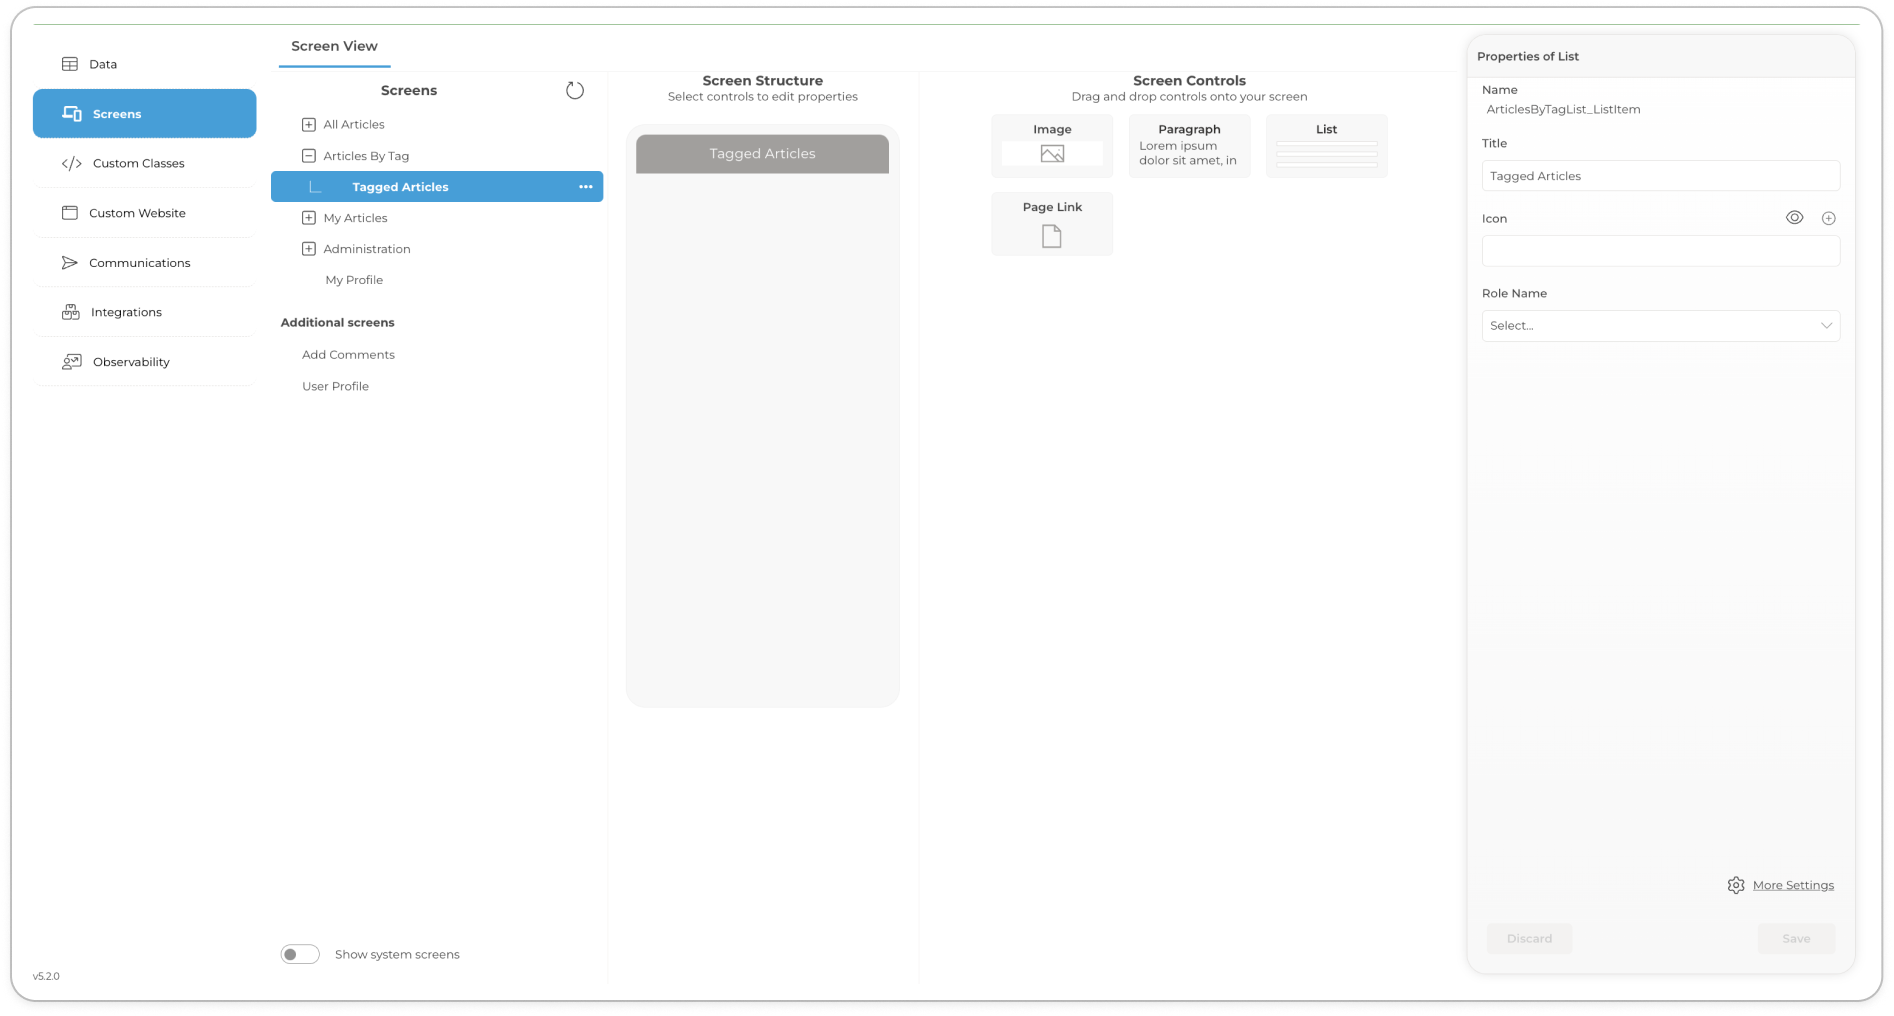
Item 1 title is updated to Tagged Articles Click the Save button to persist your changes
Click and select the Tagged Articles screen in the Screen View, to activate its Screen Structure:
Drag and drop the "List" form control from the Screen Controls onto the Tagged Articles screen structure.

Click on the List control to activate its supported Properties Editor, then set the properties outlines in the table below:
PropertyValueDescriptionData Path
/Post
This property specifies the API endpoint or route for fetching posts from the backend. The
/Postvalue indicates the data path that the application uses to retrieve post-related data, serving as the primary access point for post resources within the system.Query
Publish eq true and Tags/any(id:id/TagId eq {{= tagId }})
This query filters the posts to be fetched based on specific conditions. It ensures that only posts which are published (
Publish eq true) and contain any tags matching a specified tag ID (Tags/any(id:id/TagId eq {{= tagId }})) are retrieved. The{{= tagId }}portion is dynamically replaced with the actual tag ID during the query execution, allowing for flexible and targeted data retrieval based on user interaction or specific criteria.Item Title
{{= Title }}
This property defines the template for displaying each item's title in the list or collection view. The
{{= Title }}template dynamically inserts the title of the post from the data retrieved, ensuring that each item accurately represents its corresponding post's title for easy identification by the user.Item Detail
{{= Summary }} Author: {{= User/Name }} {{= User/Surname}}
Specifies the template for presenting detailed information about each post item. This template combines static text with dynamic placeholders, displaying the post's summary followed by the author's name and surname. The
{{= Summary }}inserts the post's summary, while{{= User/Name }}and{{= User/Surname}}are replaced with the author's first and last names, respectively. This detailed format provides a comprehensive overview of each post, enhancing user engagement and understanding of the content available.Drag and drop the "Form" screen control from the Screen Controls onto the activated List, this action will nest a Form Page, Item 1 as shown in the screenshot below:

In the next step we will configure Item 1 to be the Tagged Articles View screen.
Tagged Articles View screen
To configure the Tagged Articles View screen created in the previous step, follow these steps:
Click and select the Item 1 screen in the Screen View, to activate its supported Properties Editor and set the properties outlined in the table below:
PropertyValueDescriptionTitle
Tagged Article View
This property sets the title or heading for a specific screen or page within the application, in this case, designated as "Tagged Article View." It indicates that the page is focused on displaying articles that have been tagged with a specific keyword or category. The title helps users understand the context and purpose of the page they are viewing, ensuring a cohesive user experience by clearly identifying the content theme or focus.
Target URL
/Post({{= postId }})
The
Target URLproperty specifies the endpoint or resource location that the application should navigate to or fetch data from, based on a dynamic identifier. In this value,/Post({{= postId }}), the URL is constructed to target a specific post within the application, with{{= postId }}serving as a placeholder for the post's unique identifier. This dynamic approach allows for the URL to adapt based on the context in which it is used, enabling direct access to detailed views of posts by substituting the placeholder with an actual post ID. This functionality is crucial for creating a navigable and user-friendly interface where users can easily access detailed information about a specific article or post.Configure the screen structure for the "Tagged Articles" view to mirror the content, layout, and properties of the "All Articles View." Ensure that the final setup for the "Tagged Articles" view is identical in terms of its presentation and functionality, providing a consistent user experience across both views.

Final screen structure of Tagged Articles View For the next step, enhance the "Edit Article" screen by integrating the capability for authors to add Tags to their posts. This addition is crucial as, while we have developed the functionality to display articles based on Tags, we currently lack a mechanism for actually assigning those Tags to articles. This enhancement will bridge that gap, allowing for a more dynamic and organised content management process.
Implement functionality to Add Tags in the Edit Article screen
To configure functionality and content to add Tags in the Edit Article screen, follow these steps:
Click and select the Edit Article screen in the Screen View, to activate its Screen Structure:
Drag and drop the "List" form control from the Screen Controls onto the Edit Article screen under the existing content, the desired layout is shown below:

Click on the List control to activate its supported Screen Controls, then drag and drop "Single Item" into the List control.
Click the Single Item from within the List to activate it so that its supported Properties Editor, then set the properties outlined in the the table below:
PropertyValueDescriptionTitle
Add Tag
This property sets the heading or name of a specific interface within the application, designated as "Add Tag." It clearly communicates to users that they are interacting with a section or screen dedicated to the creation or addition of new tags. This title is essential for guiding users through the functionality of the app, ensuring they understand they are in the process of tagging items, such as articles or posts.
Icon
svg/sdk/plus-circle-dotted/Bootstrap/regular
This property specifies an icon to be used alongside the user interface, particularly to visually represent the action or feature it accompanies, in this case, adding a tag. The value
svg/sdk/plus-circle-dotted/Bootstrap/regularindicates the file path and style for a specific icon within a standardised set or library. The icon, described as a "plus-circle-dotted" from the Bootstrap collection in its regular form, symbolises the addition of new elements or features, such as tags, enhancing the visual appeal and intuitive understanding of the function it represents.Data Path
?postId={{= postId }}
The
Data Pathproperty defines a query parameter to be appended to a base URL, targeting a specific resource or action within the application. In this context,?postId={{= postId }}is used to specify that the operation or data retrieval should be related to a particular post, identified by its unique ID (postId). The{{= postId }}acts as a dynamic placeholder that is replaced with the actual ID of the post in question, allowing for tailored interactions or data fetches based on the specific post being viewed or edited.Page
./AddTag
This property indicates the relative path to a specific page or component within the application, named "AddTag." The
./AddTagvalue suggests that this page is dedicated to the functionality of adding new tags, located within the same directory or level as the reference point in the application's structure. This setup facilitates easy navigation and modular development, ensuring that users can access the tag addition features seamlessly as part of their interaction with the app.After adjusting the settings for the Single Item, click outside the screen structure area to deactivate your previous selection.
Drag the "Paragraph" screen control into the Screen Structure. Then, using Markdown, add the text as illustrated in the screenshot provided below.

Drag and drop the "List" form control from the Screen Controls under the content added in the previous step, the desired layout is shown below:

Click on the List control to activate its supported Screen Controls, then drag and drop "Entity Items" into the List control.
Click the Entity Items from within the List to activate it so that its supported Properties Editor, then set the properties outlined in the the table below:
PropertyValueDescriptionEntity Set or Navigation Property
/Tags
This property specifies the path used to fetch data. In this context, the value "/Tags" indicates that the data for the entity items will be retrieved from the "Tags" endpoint in the OData service.

Next, proceed to develop the "Add Tags" screen, as previously mentioned in the TARGET URL section. This step involves creating the actual interface that will facilitate the tagging functionality.
Add Tag screen
To create the Add By Tag screen, follow these steps:
Under Additional Screens, select 'User Profiles' and click the three-dot-button adjacent to the selected screen, then click Add form as shown below:
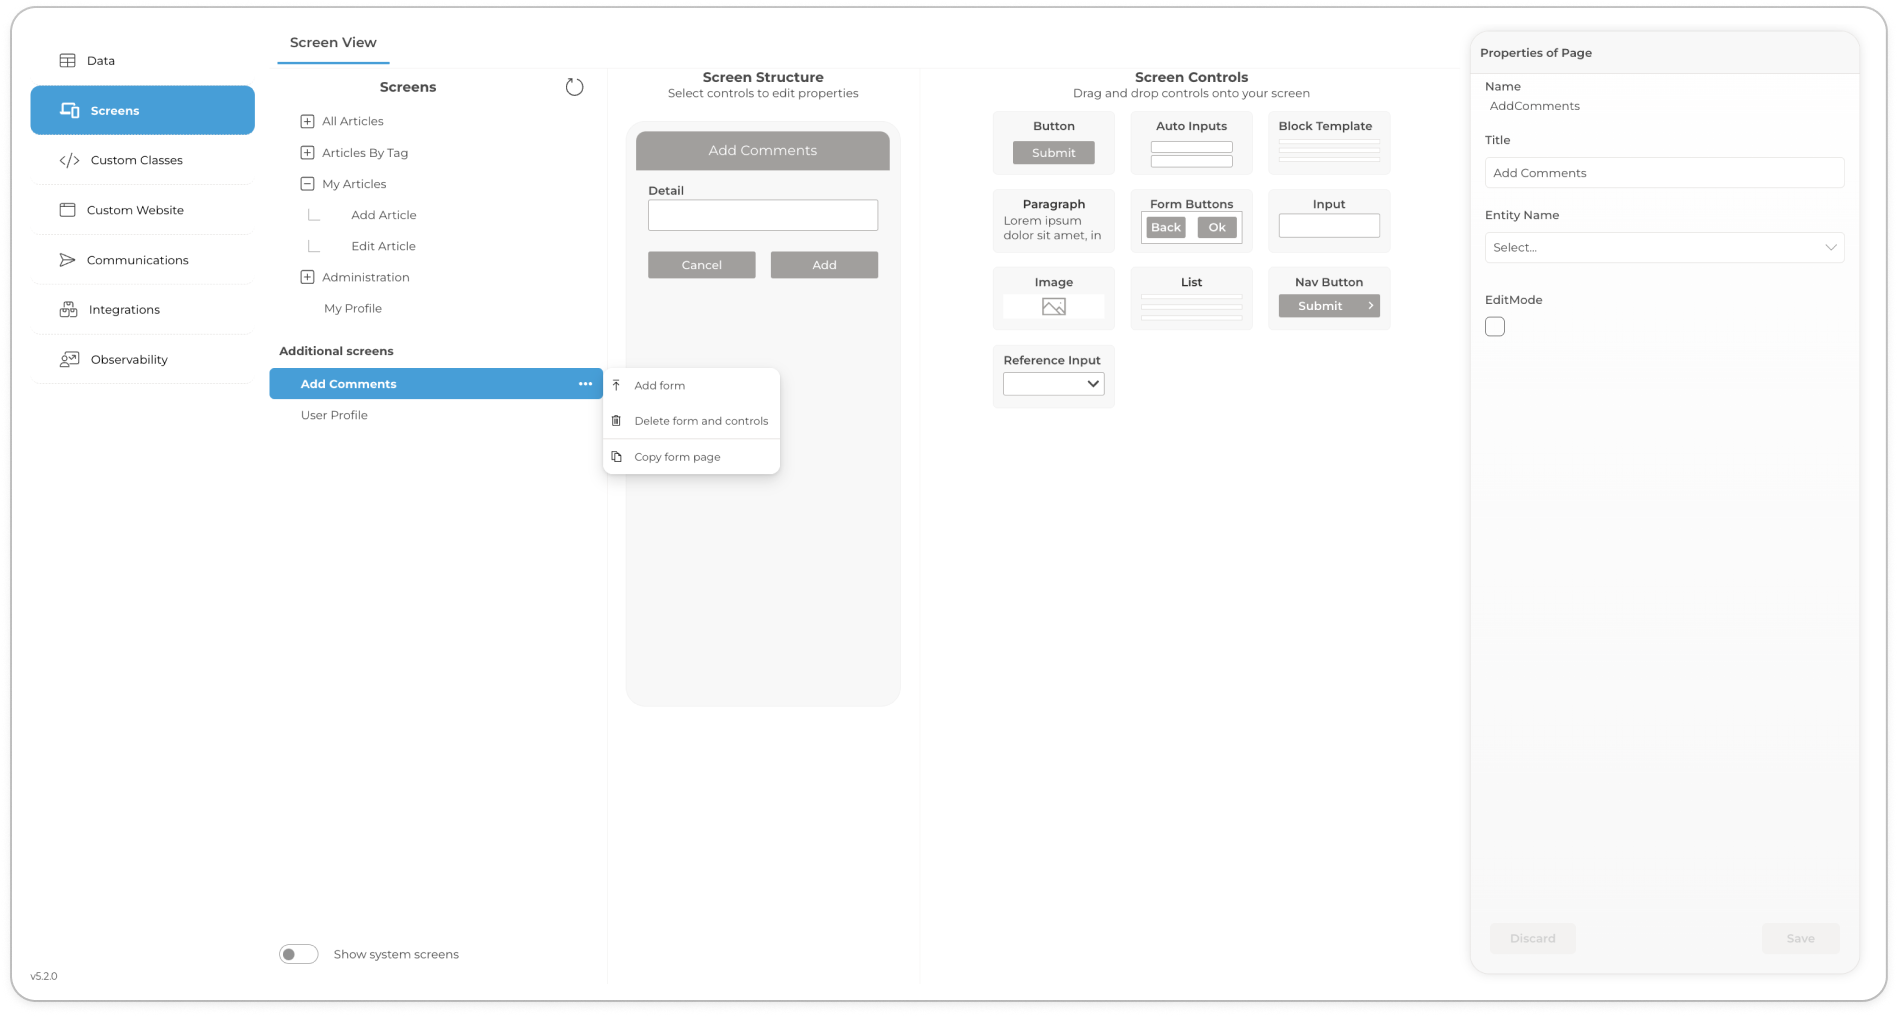
When the Add new window appears, choose Form Page as the page type and set the Title to Add Tag:

Click the Add Tag screen created in the previous step, to activate its Screen Structure.
Drag the "Paragraph" screen control into the Screen Structure. Then, using Markdown, add the text as illustrated in the screenshot provided below.

Drag the "Reference Input" screen control into the Screen Structure. The click it to activate its supported Propertied Editor then set the properties outlines in the table below:
PropertyValueDescriptionProperty Name
Tags
Name assigned to the Reference Input field
Data Path Template
/Tag
The
Data Path Templatespecifies the API endpoint or route for accessing tag-related data. The value/Tagdesignates the path to the resource where tags are stored or managed in the backend. This path is utilized by the application to perform operations such as retrieving, adding, or updating tags, ensuring a direct link to the tags resource for efficient data handling.Query
Posts/all(s:s/PostId ne {{= postId }})
This query is designed to filter and retrieve data based on certain conditions related to posts. Specifically, it ensures that only posts not matching a specified post ID (
PostId ne {{= postId }}) are fetched. The{{= postId }}is a dynamic placeholder that gets replaced with an actual post ID during the query execution, allowing for the exclusion of a specific post from the results.List Title Template
{{= Name}}
This property defines the template for displaying the title of each item in a list, particularly when dealing with a collection of tags. The
{{= Name}}template dynamically inserts the name of the tag from the retrieved data, ensuring that each list item accurately reflects the tag's name. This approach provides a clear and direct representation of tags in the user interface, enhancing navigation and selection within the application.
Drag the "Button" screen control into the Screen Structure. The click it to activate its supported Propertied Editor then set the properties outlines in the table below:
PropertyValueDescriptionButton Text
Add
This property specifies the text to be displayed on a button, guiding users on the action that will be performed upon clicking. The value "Add" indicates that the button is intended for operations that involve adding new items, entries, or data into the application. It's a clear call-to-action for users to initiate an addition process, whether it's adding a new post, tag, or any other entity within the application's context.
Verb Name
PATCH
The
Verb Namerefers to the HTTP method used for a particular operation in web development, especially in API calls. The value "PATCH" specifies that the operation involves partially updating an existing resource. Unlike PUT, which replaces the entire resource, PATCH is used to make changes to specific fields of a resource without altering the entire data set. This method is commonly used for updating records or settings in an application, allowing for more efficient and targeted data modifications.Document Template
{"url":"http://localhost:82/blogapp/ds.svc/Tag({{= Tags/TagId }})"}
Replace
blog-appin the url with your application name refer to General for more information on how to access your application name
Manage Tags
The responsibility of adding article tags to the application is assigned to the Staff user role. Follow the instructions below to implement this feature:
Access the Administration Screen:
Navigate to the Administration screen.
Locate and select the Content Management section within the screen structure.

Select the List Screen Control:
Under the Content Management section, click the List screen control to select it
Add Navigation Page Item Controls:
Drag and drop a Navigation Page Item controls into the active list. This action will nest these pages within the Administration page.
Configure the Navigation Page Item:
Select there Navigation Page control from the list by clicking it to activate the Properties Editor.
Populate the necessary fields as outlined below:
Screen ControlPropertyValueNavigation Page Item
Title
Article Tags
Icon
tags
Click the Save button to persist your changes.
Expand the Administration screen and select the Article Tags screen to activate its relevant Screen Structure and Controls.
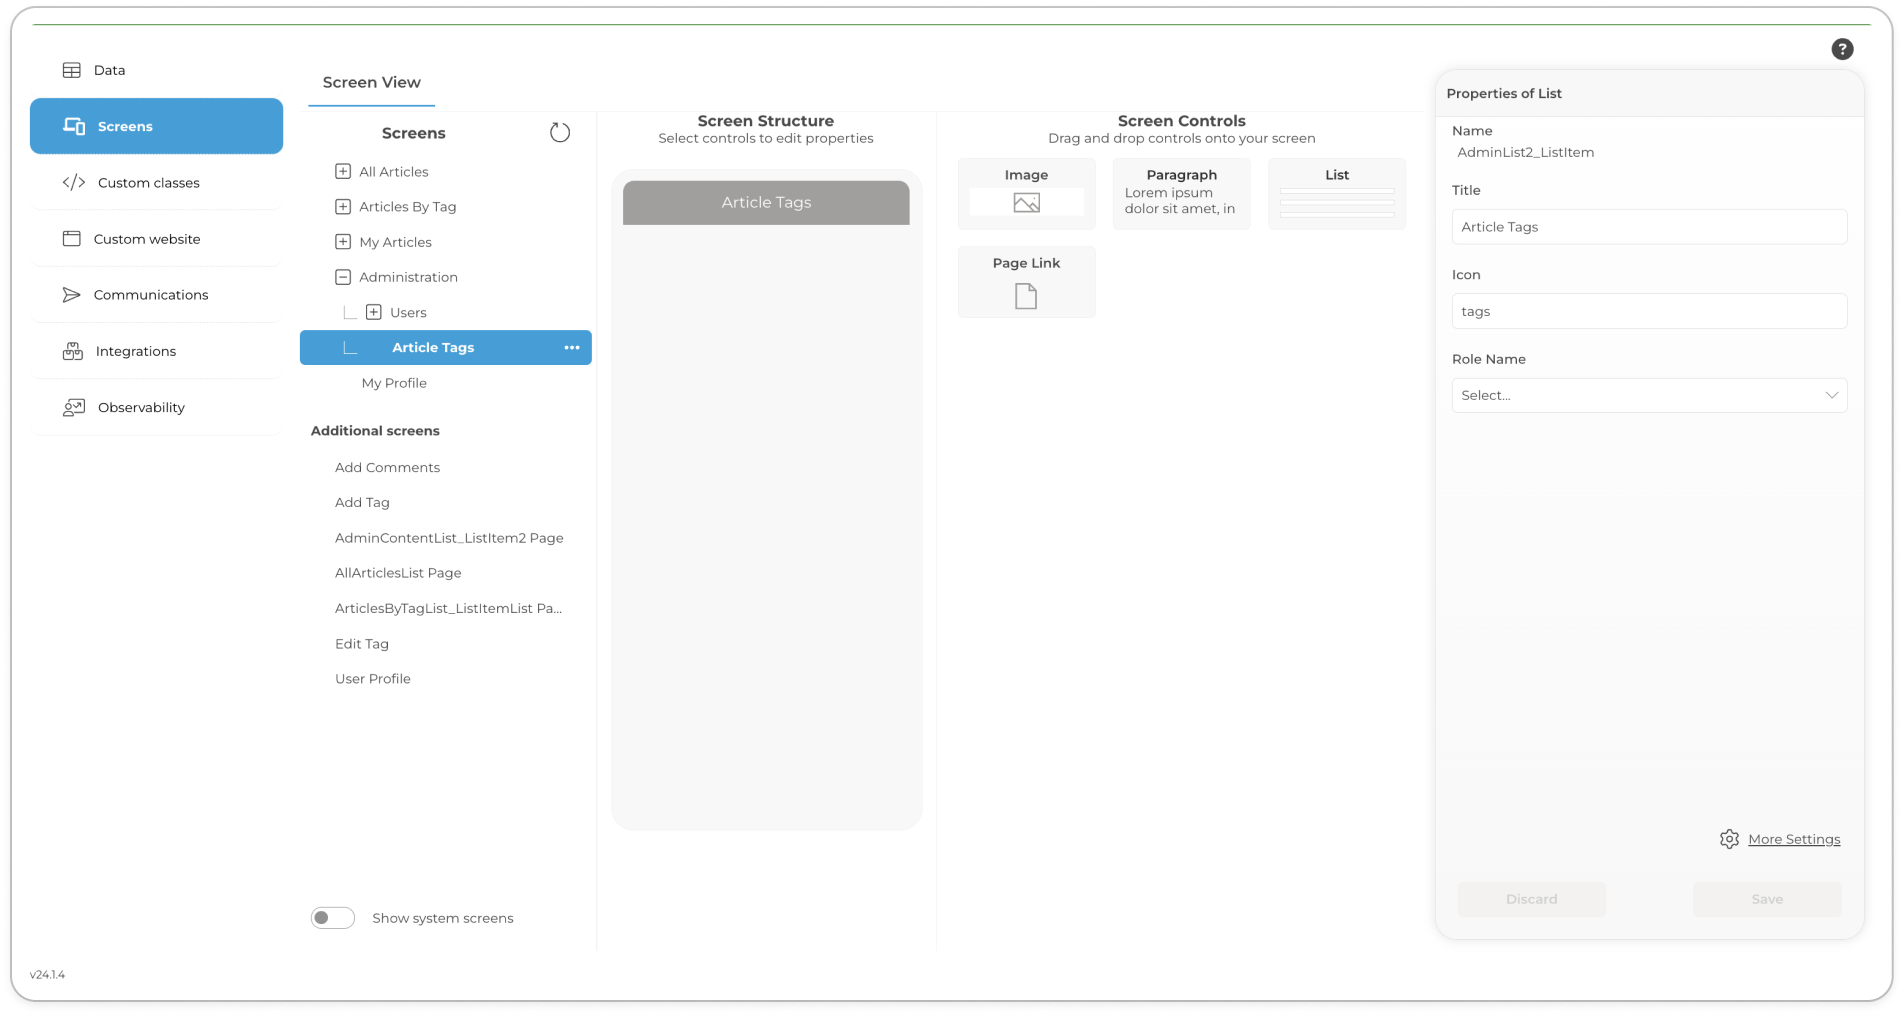
Drag and drop the Page Link screen control into the Article Tags screen structure
Click on the Page Link control then configure its properties outlined in the table below
PropertyValueTitle
Add Tag
Icon
nn_more
Role Name
Staff
Target URL
/Tag
Page Name
AdminList2_ListItem - this page is autogenerated by the system its name might vary.
Click the Save button to persist your changes.
Drag and drop a Paragraph screen control into the Add Tags screen
Using Templated Markdown populate the Paragraph with the content:
##Tags ListDrag and Drop a List into the screen and configure its following properties:
PropertyValueTarget URL
/Tag
Click the Save button to persist your changes.
Expand the Article Tags screen to view the Add Tag screen added in step 8.
Click the Add Tag screen in the Screen View to activate its Screen controls
Drag and Drop two Input controls and Button onto the into the screen and configure their corresponding screen control properties as specified in the table below:
Screen ControlPropertyValueInput
Property Name
Name
Input
Property Name
Icon
Button
Button Text
Add
Verb Name
POST
Click the Save button to persist your changes.
Launch your app to publish your changes you will be automatically redirected to a web application, if you have not yet registered in the app proceed to do so. Add a Staff role to your account so as to be able to manage Tags view Users and Roles for information about managing role based user access.
Conclusion
In conclusion, this tutorial has guided you through the essential steps and techniques to effectively enhance your application. From configuring screen structures to integrating dynamic content management features such as tagging, we've covered a broad spectrum of functionalities that are crucial for a modern, user-friendly application.
Last updated